Tutorial 24: How to Make an Image Appear Three Dimensional
Gimp 101
In this tutorial, I’m going to show you how to make an image appear three dimensional! :)
1. Open up Gimp and open up an image, any image.
2. Duplicate the image.
3. Go to the bottom layer and click on Colors > Colorize. Match your settings to mine:
4. Click on the eye next to the top layer and make sure your bottom layer looks like this:
5. Now make your top layer visible once again. Go up to Colors > Colorize. Match your settings to mine:
Your top layer should now look like this:
6. Go over to the layer’s palette and lower the opacity of the top layer to 50%, like this:
The image should now look grayish, kind of desaturated, like this:
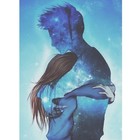
7. Click on the move tool, , and move the top layer a little to the left or right. Now it should look like this:
Now, you’re finished! Ta-dah! If you have any questions or comment please feel free to post them in the comment section below. :)
Comments