Tutorial 9: Blending Techniques
Gimp 101
We are going to learn two different blending techniques:
- Erasing Technique
- Masking Technique
Before we start, I highly recommend you download my Circle Fuzzy Brush Pack for Gimp. Unfortunately, with Gimp 2.8, it didn’t come with this pack of fuzzy brushes like it did with Gimp 2.6. Please go on ahead and download them and install them into your brushes folder. If you are unsure how to download and install brushes, please refer to this tutorial. Now, let’s begin, shall we?
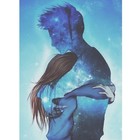
Here are the two images I’m using for this tutorial:
They are some of my favorite HQ pictures from two of my favorite groups. Anytime you’re making a poster and such, please be sure to use only HQ pictures. Also, if you plan on using those pictures, or another set of pictures, please be sure to save them in your Pictures folder before opening Gimp. I saved them as:
- GirlsGenerationasBrides.jpg
- 2PMinSuits.jpg
Save them however you like but just be sure to keep them in their .jpg format.
Erasing Technique
1. Open Gimp.
2. Go up to File > New.
3. Match your settings with the settings I used:
4. Now go up to File > Open as Layers. Go to the Pictures folder and look for the SNSD and 2PM pictures, or whichever pictures you have chosen to use for this tutorial. Be sure to open them up as layers.
5. Go over to the layers palette and right click on the 2PM picture. Go to Scale Layer. Match your settings with the settings I used:
Be sure to keep the chain linked together. Repeat this same process with the SNSD picture. Match your settings with the settings I used:
6. Move the 2PM picture above the SNSD picture on the layers palette. It should look something like this:
Also, move the 2PM picture to the top of the canvas, like this:
Now go back to the 2PM layer in the layers palette and right click on it again. Choose ‘Add Alpha Channel.’ You might want to go on ahead and add an alpha channel to the SNSD layer as well.
7. Now go to the toolbox and click on the eraser tool. Look down at the eraser palette which is right below the toolbox. Where it says Brush, their is an input box underneath it, click on i
Comments