lesson 4: Add Music
ドリーミン (Dreamin') Tutorial

now playing NCT127 - Limitless


LESSON 4: ADD MUSIC
Yeah I'm back with new lesson, so I will do the lesson on how to add music in your layout. I made 2 version, one the easier and another one same as mine. the second one is a hard and you have to know some knowledge in coding.
1. Add music (easier).
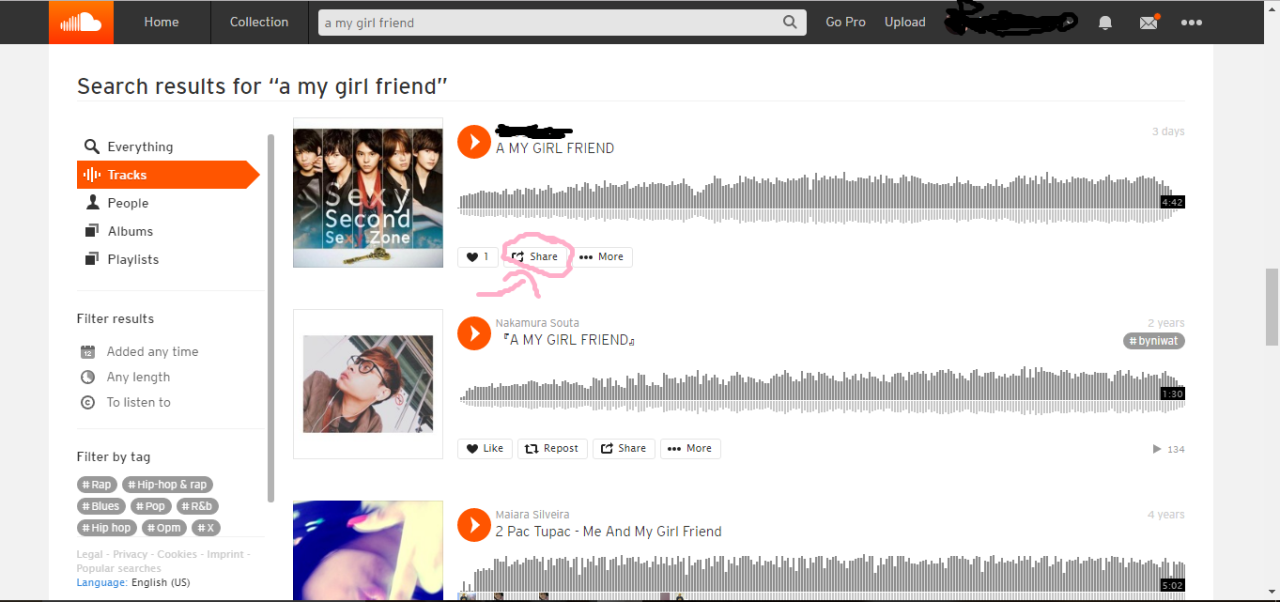
1. So first is go to Soundcloud. Search for the song that you want to add. By the way it may be difficult for you to find some songs because mostly in soundcloud are cover. Some songs can't be upload because of copyright. But I found EXO, Bigbang songs mostly. You can try search for any other songs. So back to our lesson, I search for y Zone - A My Girlfriend. (FYI y Zone is one of Japanese Boy Group. Yeah I like Jpop. By the way A My Girlfriend that I'm going to choose is from my account. Yeah I upload it *grinned)
2. When you have found the song that you want, click on Share.
3. A window will pop-up. Click on Embed.
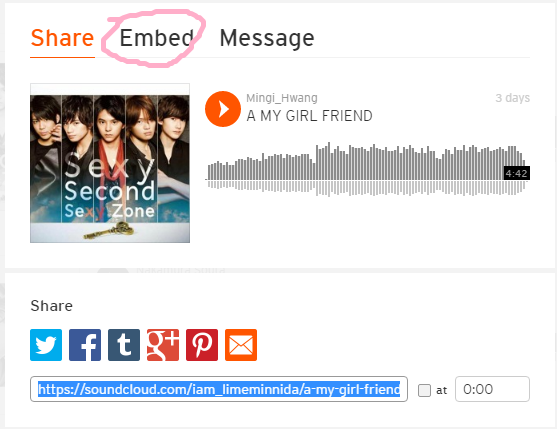
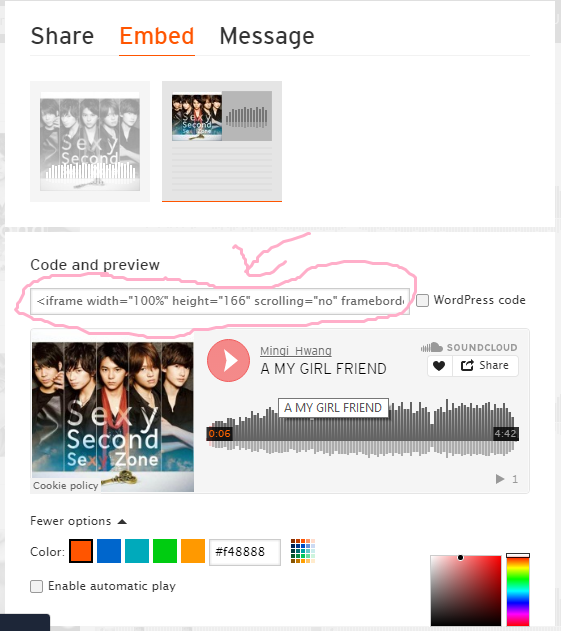
4. You will see this. You can choose either the preview in left or right. I choose the right one. If you want artwork (album cover) to be in your player, choose the left one. You can directly copy the code and paste it in Source in the Asianfanfics. But I will add some more things in next step.
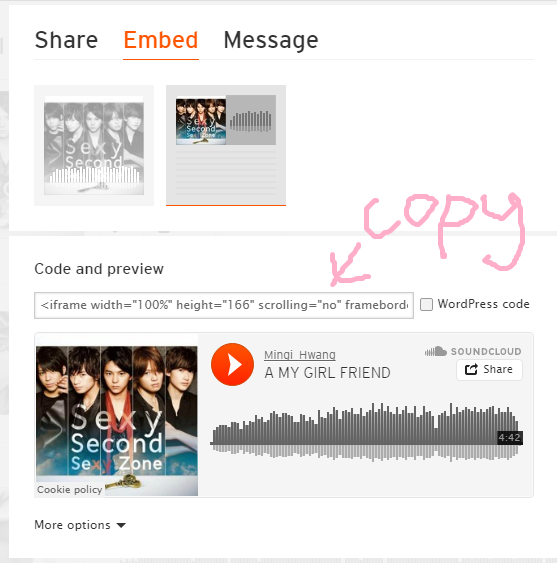
5. As you see below the preview, you can see More Options. If you click on it, you will be able to change your player into any colour that you like. I click on it then click on the colours besides the box that have HEX Codes. I randomly choose a colour. I find out that the Enable Automatic Play is cant be used even after that function has been converted into codes.
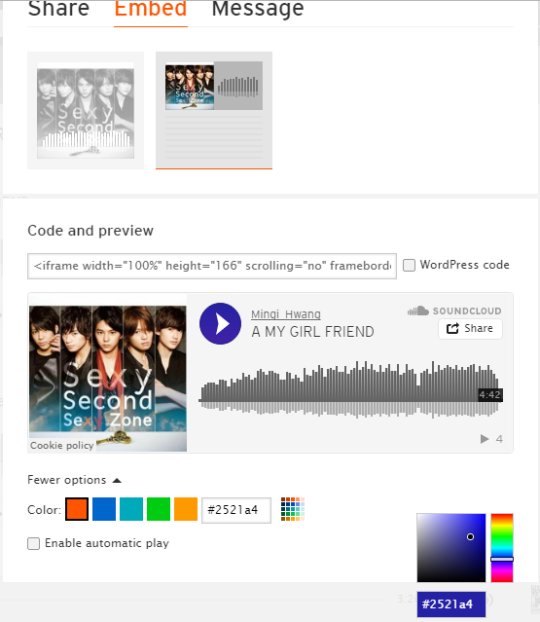
6. After you have changed your player, you can copy the codes. The HEX Codes (for colour) has been changed to the colour that you have choosen. Copy the codes and let's go to Asianfanfics.
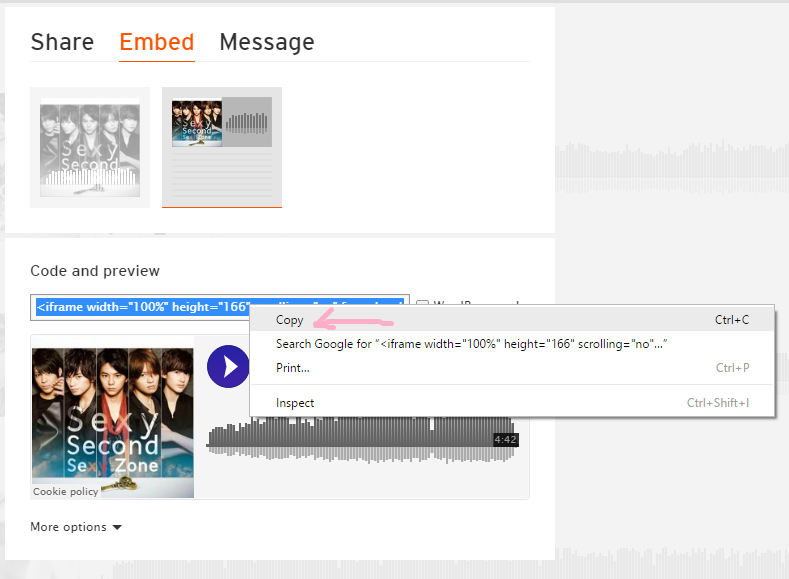
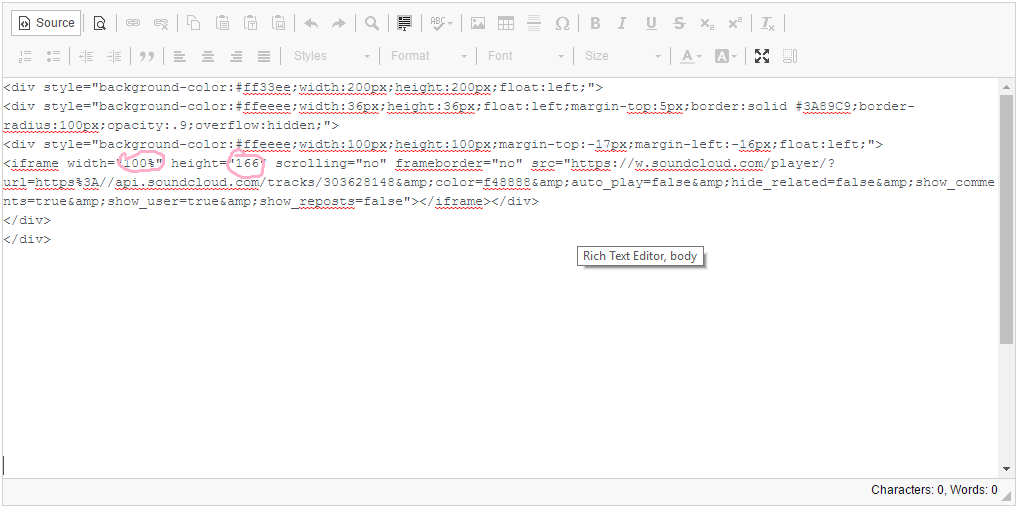
7. In edit chapter, click on Source and paste the code. Your code will look like this.

8. Next I'm going to change and delete certain things. First is change the width from '100%' to '60', delete the % too. Then change the height from '166' to '70'. (I forgot to circle or highlight it in the screenshot ;W;). By the way, the size can be any size that you want. After that, delete & show_comments=true& (it's up to you if you want to delete or not).

9. Your codes will look like this. I know that the codes is crazy because if you noticed, the width is at the end of codes while in photo in step 8, the code is at front.

10. Click on Source again you will see like this. Of course you cant try to listen to the songs. So you have to click on view to listen to the song (i mean you can't listen to the songs when editing).

11. Below is my player from the same code I used above. You may try to listen to the song if you haven't listen to it before. (y Zone is my second fav japanese boy group hehe).
2. Add music (harder)
Since I haven't teach text boxes so it might difficult to those who are still beginner and not familiar with coding yet. But everyone can learn and do this, just follow the steps.
1. So first is you have to copy these codes, these are for the first text box that we will make. Click on Source and paste the code. Make sure to remove/ delete the spaces or else your codes won't work. The size of the text boxes can be changed as long as not smaller than height 40px and width 40px;
< div style="background-color:#ff33ee;width:200px;height:200px;float:left;" > < /div >

2. If you click on source you will this text box. (Don't worry about the colour, we will fix it in last step). Now click on Source again.

3. As you in the codes there are codes that written & nbsp; (in the codes there is no space), select/highlight it and change it with these codes. So make sure to copy these codes first before you remove the & nbsp ;. Make sure to delete the spaces. Below the photos i explained to you about the codes.
< div style="background-color:#ffeeee;width:36px;height:36px;float:left;margin-top:5px;border:solid #3A89C9;border-radius:100px;opacity:.9;overflow:hidden;" >< /div >

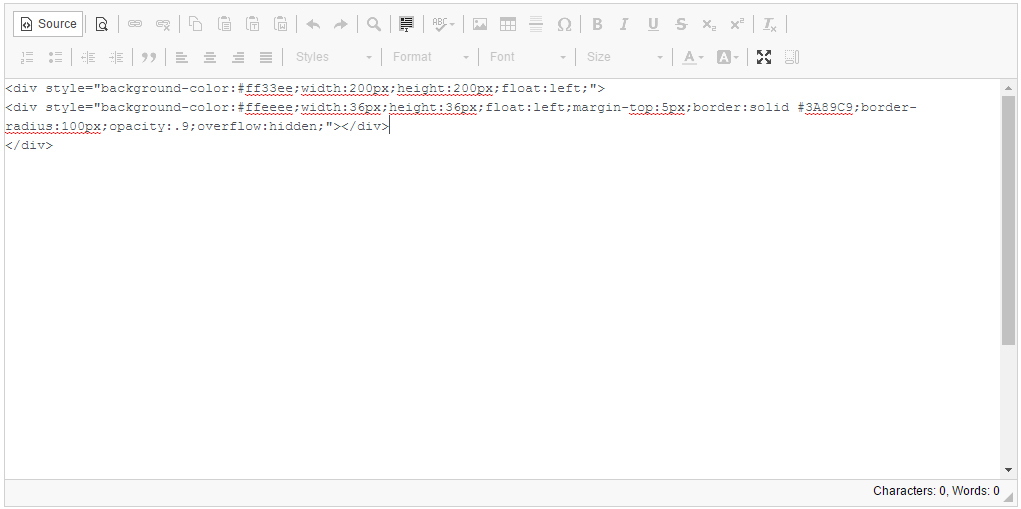
width and height is exactly for the size of the circle to play and pause the player. float:left is a must in layout or else your photo, player might appear behind the text boxes (im not sure is it true or not but it happened to me before). border-radius:100px is to make your text box become circle. opacity:.9 is to avoid from your player become a square that can make your player look weird. margin-top is just additional, not necessary tbh. overflow:hidden is to avoid the player can be scroll since the player size will be bigger than the second text boxes. the second text box is for your pause and play of the player can be seen only.
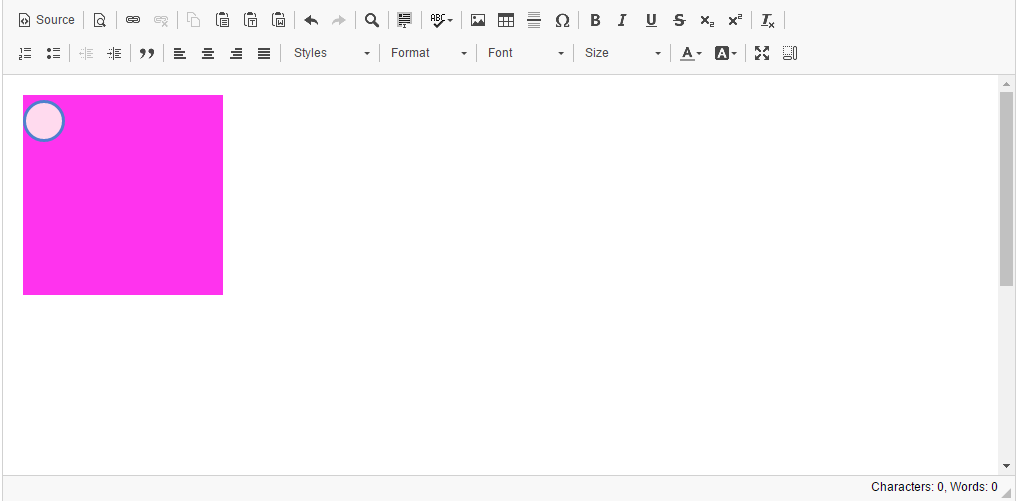
4. When you click on source it will become like this. That small circle is where the play and pause of you player will be. Click on Source again.
5. This is the last text box that you have to do. Yeah they are three text boxes altogether. Now select/highlight the & nbsp ; (it automatically appear even there's no of it in the code that you copied from here just now). Change the & nbsp ; with the codes below. Make sure to remove the spaces. Further information about the codes below the photos.
< div style="background-color:#ffeeee;width:100px;height:100px;margin-top:-17px;margin-left:-16px;float:left;" >< /div >


the width and height can be any size. margin-top and margin-left is exactly can get you the circle for play and pause of your player to be in the circle that we made in step 3.
6. When you click on Source, it will look exactly same as in step 4 because the background colour for second box and third box are both the same. don't worry the third box is there.

7. Now we have to go to Soundcloud. Search for the song that you want. I choose the same song but I change the colour to something more pink.but it will look weird because the border is blue. I forgot to change it ==. Copy the codes. IMPORTANT! The colour of your player is better if you put the colour that darker so that you can see the play and pause button.
8. Paste the code in the codes that we made in Asianfanfics. Paste the code after the codes for the third boxes. (SORRY!!! I forgot to screenshot it, so I used the codes below to show you)
< div style="background-color:transparent;width:700px;height:100px;margin-left:30px;float:left;" >
< div style="background-color:transparent;width:36px;height:36px;float:left;margin-top:5px;border:solid #3A89C9;border-radius:100px;opacity:.9;overflow:hidden;" >
< div style="background-color:#ffeeee;width:100px;height:100px;margin-top:-17px;margin-left:-16px;float:left;" >& nbsp ;< /div >
< /div >
< /div >
The one I highlight with grey background is the one that you will change with the code that you get from Soundcloud. It will look like below.

9. Next we will change the width and height to 100 for both (I use the same size as the third text box). Delete % in width too. Then delete hide_related=false& show comments=true& show_reposts=false. If you don't want to delete these, it still fine.
10. I cant show you the screenshot after I deleted and change those in step 9. But I think you guys can do it. So let's skip that part and click on Source. You will see something in your circle. That's mean you already have your player there.

11. In this last step we will make your first text box disappear. Go to source again. I circled two HEX Codes (for colour), in first box and second box. now change both HEX Codes to transparent, remove the # too. If you want to put the third box into transparent it's fine too.
12. This step only show the final result of your codes. When you click on Source. The pink text box that we made at first step already disappear (transparent). View it and you will be able to have your music player same like mine. Below the photo I have mine that I made using the same codes. (Heheh sorry this one is i havent change the colour ;A;)
Finally I finish this lesson. I can update this lesson yesterday but I have my driving class, then after I back home I have to help my sister with her homework and I finish it at night but suddenly the internet messed with me. So this lesson is really long and hard. I hope everyone can understand since english is not my first language. Any problem or questions, comment below I'll reply to you ASAP.
Yeah I'm back with new lesson, so I will do the lesson on how to add music in your layout. I made 2 version, one the easier and another one same as mine. the second one is a hard and you have to know some knowledge in coding.
1. Add music (easier).
1. So first is go to Soundcloud. Search for the song that you want to add. By the way it may be difficult for you to find some songs because mostly in soundcloud are cover. Some songs can't be upload because of copyright. But I found EXO, Bigbang songs mostly. You can try search for any other songs. So back to our lesson, I search for y Zone - A My Girlfriend. (FYI y Zone is one of Japanese Boy Group. Yeah I like Jpop. By the way A My Girlfriend that I'm going to choose is from my account. Yeah I upload it *grinned)
2. When you have found the song that you want, click on Share.
3. A window will pop-up. Click on Embed.
4. You will see this. You can choose either the preview in left or right. I choose the right one. If you want artwork (album cover) to be in your player, choose the left one. You can directly copy the code and paste it in Source in the Asianfanfics. But I will add some more things in next step.
5. As you see below the preview, you can see More Options. If you click on it, you will be able to change your player into any colour that you like. I click on it then click on the colours besides the box that have HEX Codes. I randomly choose a colour. I find out that the Enable Automatic Play is cant be used even after that function has been converted into codes.
6. After you have changed your player, you can copy the codes. The HEX Codes (for colour) has been changed to the colour that you have choosen. Copy the codes and let's go to Asianfanfics.
7. In edit chapter, click on Source and paste the code. Your code will look like this.
8. Next I'm going to change and delete certain things. First is change the width from '100%' to '60', delete the % too. Then change the height from '166' to '70'. (I forgot to circle or highlight it in the screenshot ;W;). By the way, the size can be any size that you want. After that, delete & show_comments=true& (it's up to you if you want to delete or not).
9. Your codes will look like this. I know that the codes is crazy because if you noticed, the width is at the end of codes while in photo in step 8, the code is at front.
10. Click on Source again you will see like this. Of course you cant try to listen to the songs. So you have to click on view to listen to the song (i mean you can't listen to the songs when editing).
11. Below is my player from the same code I used above. You may try to listen to the song if you haven't listen to it before. (y Zone is my second fav japanese boy group hehe).
2. Add music (harder)
Since I haven't teach text boxes so it might difficult to those who are still beginner and not familiar with coding yet. But everyone can learn and do this, just follow the steps.
1. So first is you have to copy these codes, these are for the first text box that we will make. Click on Source and paste the code. Make sure to remove/ delete the spaces or else your codes won't work. The size of the text boxes can be changed as long as not smaller than height 40px and width 40px;
< div style="background-color:#ff33ee;width:200px;height:200px;float:left;" > < /div >
2. If you click on source you will this text box. (Don't worry about the colour, we will fix it in last step). Now click on Source again.
3. As you in the codes there are codes that written & nbsp; (in the codes there is no space), select/highlight it and change it with these codes. So make sure to copy these codes first before you remove the & nbsp ;. Make sure to delete the spaces. Below the photos i explained to you about the codes.
< div style="background-color:#ffeeee;width:36px;height:36px;float:left;margin-top:5px;border:solid #3A89C9;border-radius:100px;opacity:.9;overflow:hidden;" >< /div >
width and height is exactly for the size of the circle to play and pause the player. float:left is a must in layout or else your photo, player might appear behind the text boxes (im not sure is it true or not but it happened to me before). border-radius:100px is to make your text box become circle. opacity:.9 is to avoid from your player become a square that can make your player look weird. margin-top is just additional, not necessary tbh. overflow:hidden is to avoid the player can be scroll since the player size will be bigger than the second text boxes. the second text box is for your pause and play of the player can be seen only.
4. When you click on source it will become like this. That small circle is where the play and pause of you player will be. Click on Source again.
5. This is the last text box that you have to do. Yeah they are three text boxes altogether. Now select/highlight the & nbsp ; (it automatically appear even there's no of it in the code that you copied from here just now). Change the & nbsp ; with the codes below. Make sure to remove the spaces. Further information about the codes below the photos.
< div style="background-color:#ffeeee;width:100px;height:100px;margin-top:-17px;margin-left:-16px;float:left;" >< /div >
the width and height can be any size. margin-top and margin-left is exactly can get you the circle for play and pause of your player to be in the circle that we made in step 3.
6. When you click on Source, it will look exactly same as in step 4 because the background colour for second box and third box are both the same. don't worry the third box is there.
7. Now we have to go to Soundcloud. Search for the song that you want. I choose the same song but I change the colour to something more pink.but it will look weird because the border is blue. I forgot to change it ==. Copy the codes. IMPORTANT! The colour of your player is better if you put the colour that darker so that you can see the play and pause button.
8. Paste the code in the codes that we made in Asianfanfics. Paste the code after the codes for the third boxes. (SORRY!!! I forgot to screenshot it, so I used the codes below to show you)
< div style="background-color:transparent;width:700px;height:100px;margin-left:30px;float:left;" >
< div style="background-color:transparent;width:36px;height:36px;float:left;margin-top:5px;border:solid #3A89C9;border-radius:100px;opacity:.9;overflow:hidden;" >
< div style="background-color:#ffeeee;width:100px;height:100px;margin-top:-17px;margin-left:-16px;float:left;" >& nbsp ;< /div >
< /div >
< /div >
The one I highlight with grey background is the one that you will change with the code that you get from Soundcloud. It will look like below.
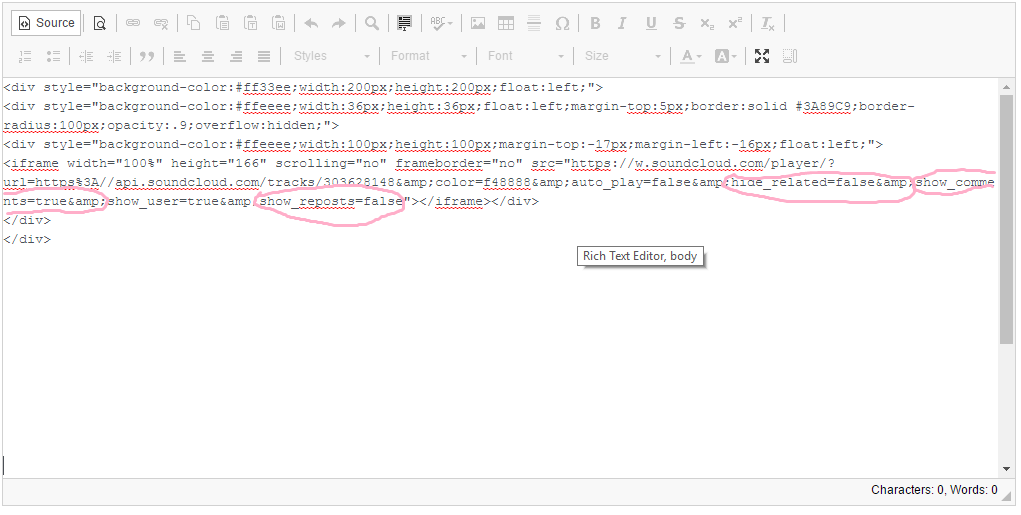
9. Next we will change the width and height to 100 for both (I use the same size as the third text box). Delete % in width too. Then delete hide_related=false& show comments=true& show_reposts=false. If you don't want to delete these, it still fine.
10. I cant show you the screenshot after I deleted and change those in step 9. But I think you guys can do it. So let's skip that part and click on Source. You will see something in your circle. That's mean you already have your player there.
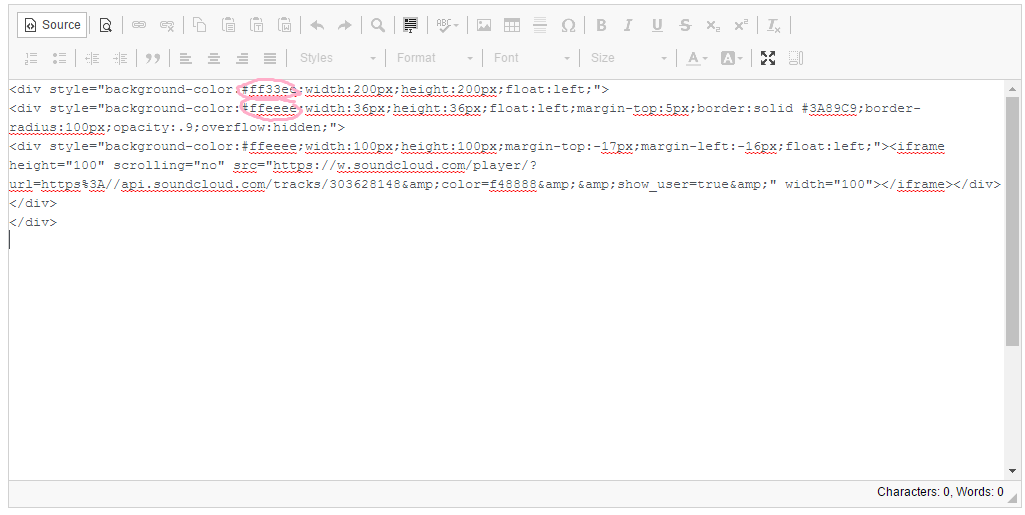
11. In this last step we will make your first text box disappear. Go to source again. I circled two HEX Codes (for colour), in first box and second box. now change both HEX Codes to transparent, remove the # too. If you want to put the third box into transparent it's fine too.
12. This step only show the final result of your codes. When you click on Source. The pink text box that we made at first step already disappear (transparent). View it and you will be able to have your music player same like mine. Below the photo I have mine that I made using the same codes. (Heheh sorry this one is i havent change the colour ;A;)
Finally I finish this lesson. I can update this lesson yesterday but I have my driving class, then after I back home I have to help my sister with her homework and I finish it at night but suddenly the internet messed with me. So this lesson is really long and hard. I hope everyone can understand since english is not my first language. Any problem or questions, comment below I'll reply to you ASAP.
Layout by minocha99 | 2017

To all subbies~~ Finally i'm back! My semester break has start since last two weeks but i was busy and just got my free time. I'm not sure how many updates i can make. But I try my best to update as many as i can. I haven't finish my render too. I just try to finish it as soon as i can.
Comments