tutorial 4: Cutting
ドリーミン (Dreamin') Tutorial

now playing NCT127 - Limitless


TUTORIAL 4: CUTTING
Like I promise in previous chapter, today I teach you on how to cut in GIMP. This is the basic in graphic designing. Cutting is useful when you want to make a romcom poster unless you already have the character's render. Before we start download the photo below. If you want to use your own photo also allowed as long as the background is simple and easy for you to do the cutting. BTW WARNING THIS TUTORIAL WILL BE SOOOOO LONG BECAUSE THERE ARE MORE THAN 30 SCREENSHOTS I MADE xD.
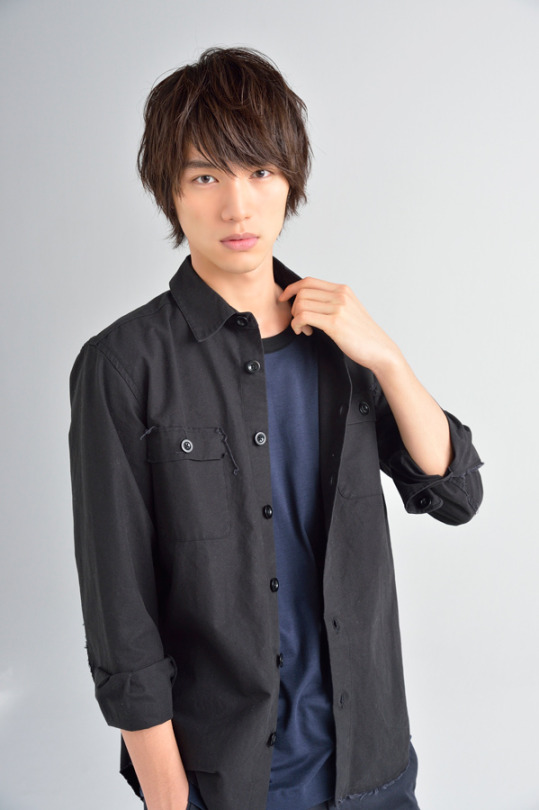
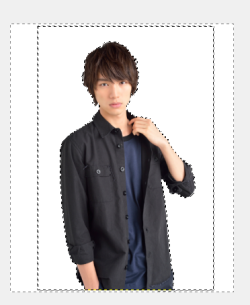
(His name is Sota Fukushi, my fav japanese actor <3~ )
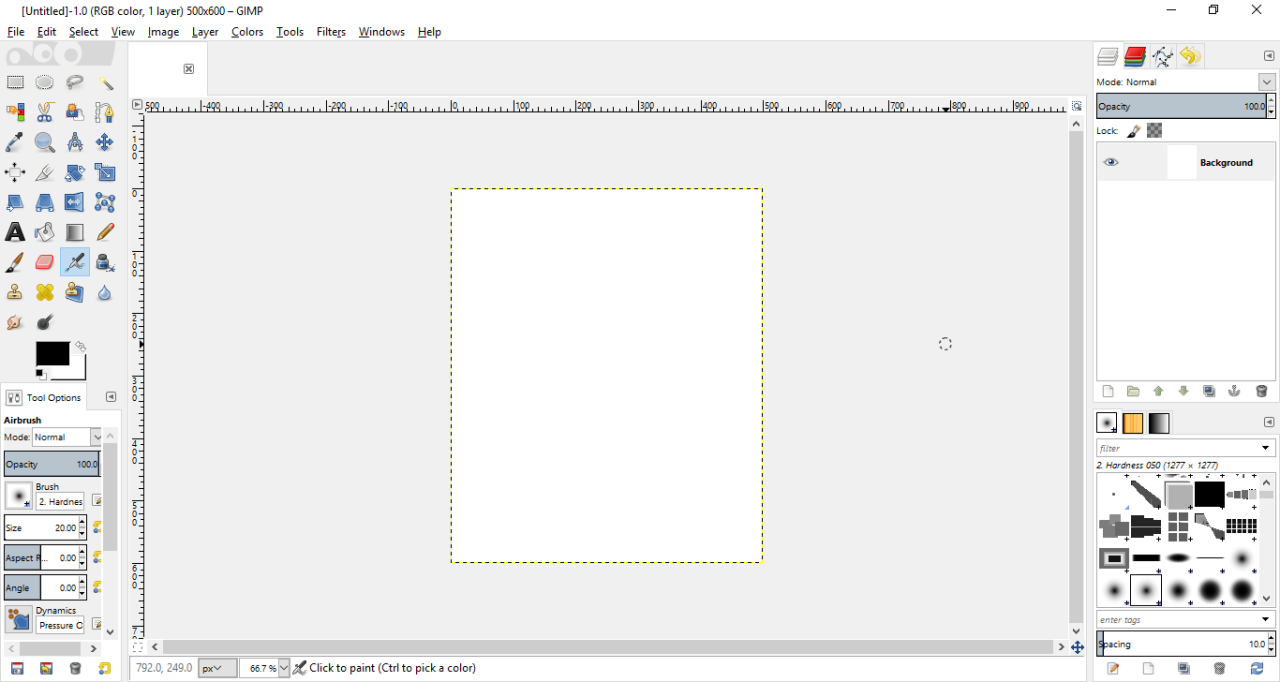
1. Open your GIMP.
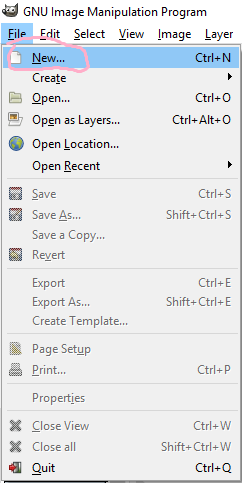
2. Now click on File then New.
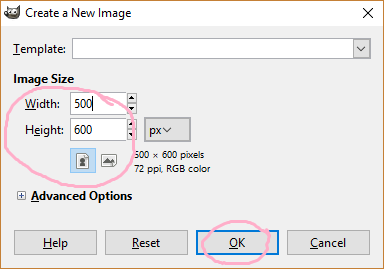
3. A new window will pop-up. Now set the width to 500 and height to 600. Then, click on Ok.
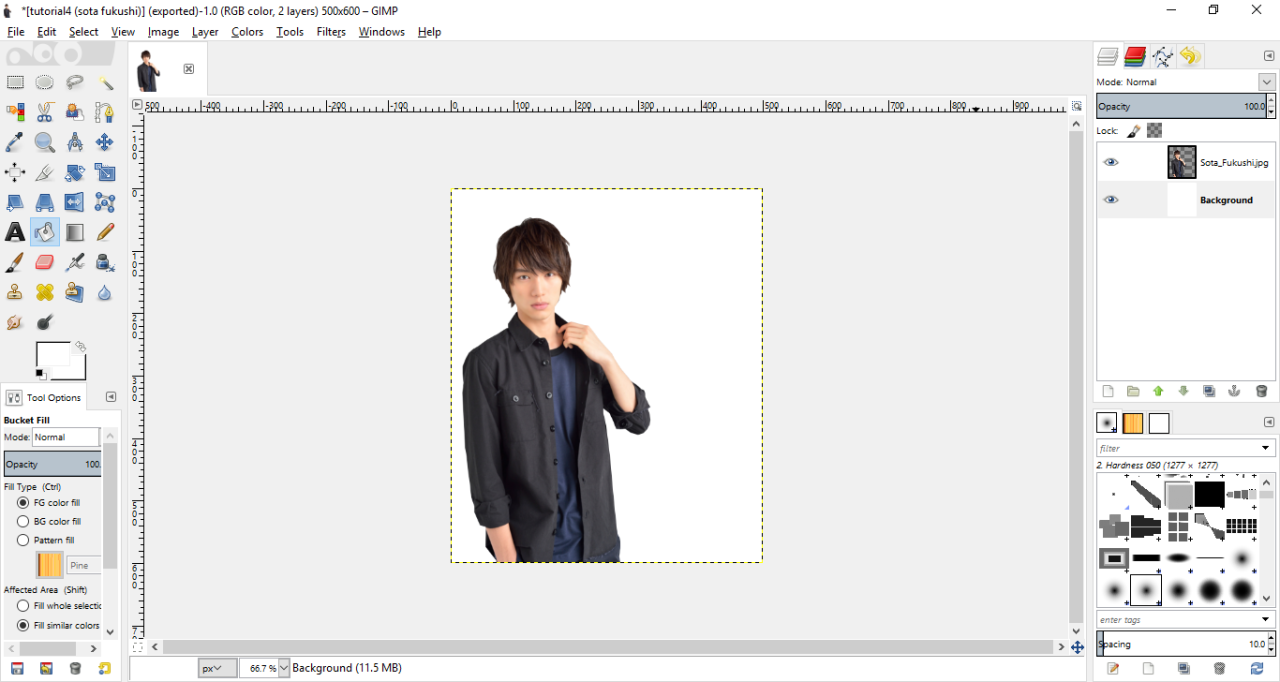
4. You will get a white background like this.
5. Now click on File again, choose Open As A New Layer.
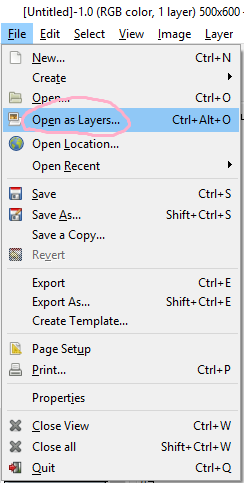
6. A new window will pop-up. Go to the folder where you saved Sota Fukushi's photo. (If you use your own then go to the folder where the photo is saved in). Click on the photo and then click on Open.
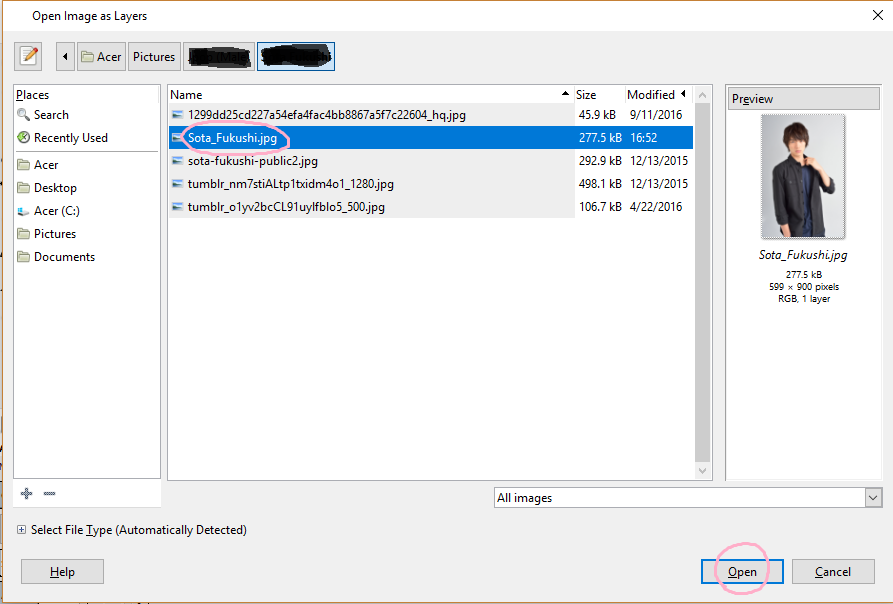
7. The photo will be open as a new layer on top of the white background. Since the photo is bigger than the background and some part are not shown, we will resize the photo. Click on SCALE tool (I circled it. If you don't see it, the tool is located in row no.4 and column no.4.
8. A new window will pop-up. Now decrease the width/ height. BUT! Before resize it, do close the chain or else when you decrease the width, you have to lower the height by your own. If the chain is closed, when you decrease the width, the height will be automatically decrease too.
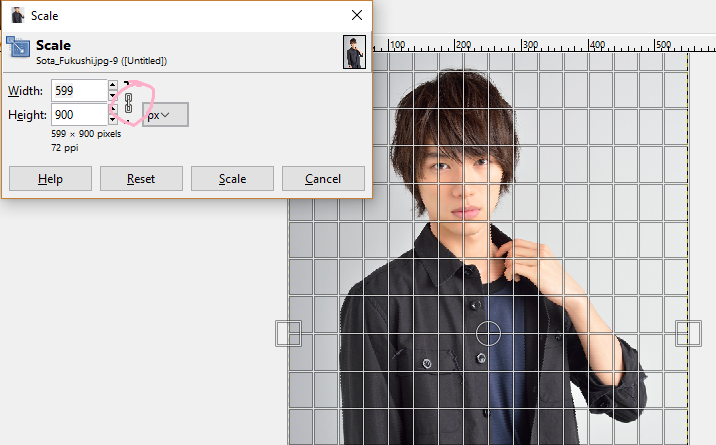
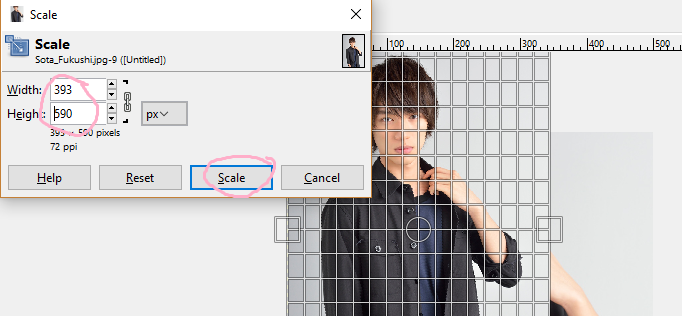
9. I resize the photo to this size. If you use your own photo, resize the width and height to be lower than the background. Now click on Scale.
10. You will get like this. As you see, the photo is went a little upper and Sota's face cannot be seen. Now we will move the photo so that it will be right in the background. Click on MOVE tool. The tool is located in row no.3 and column no.4 (above the SCALE tool).
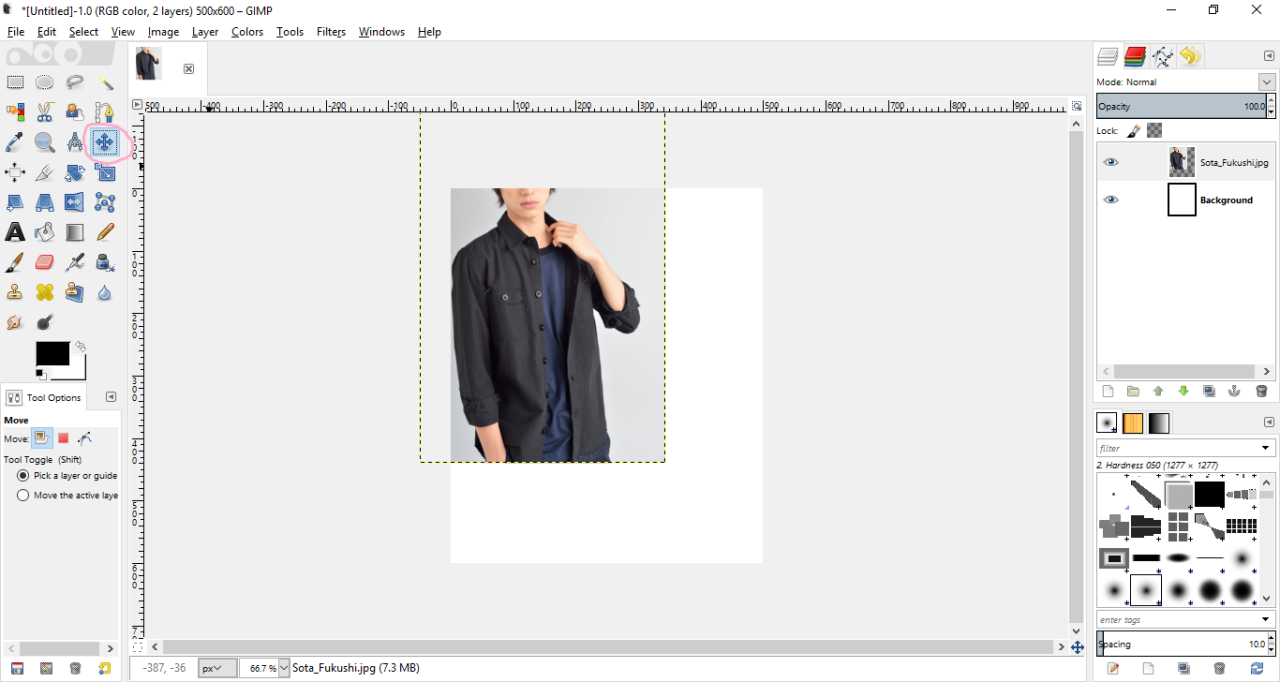
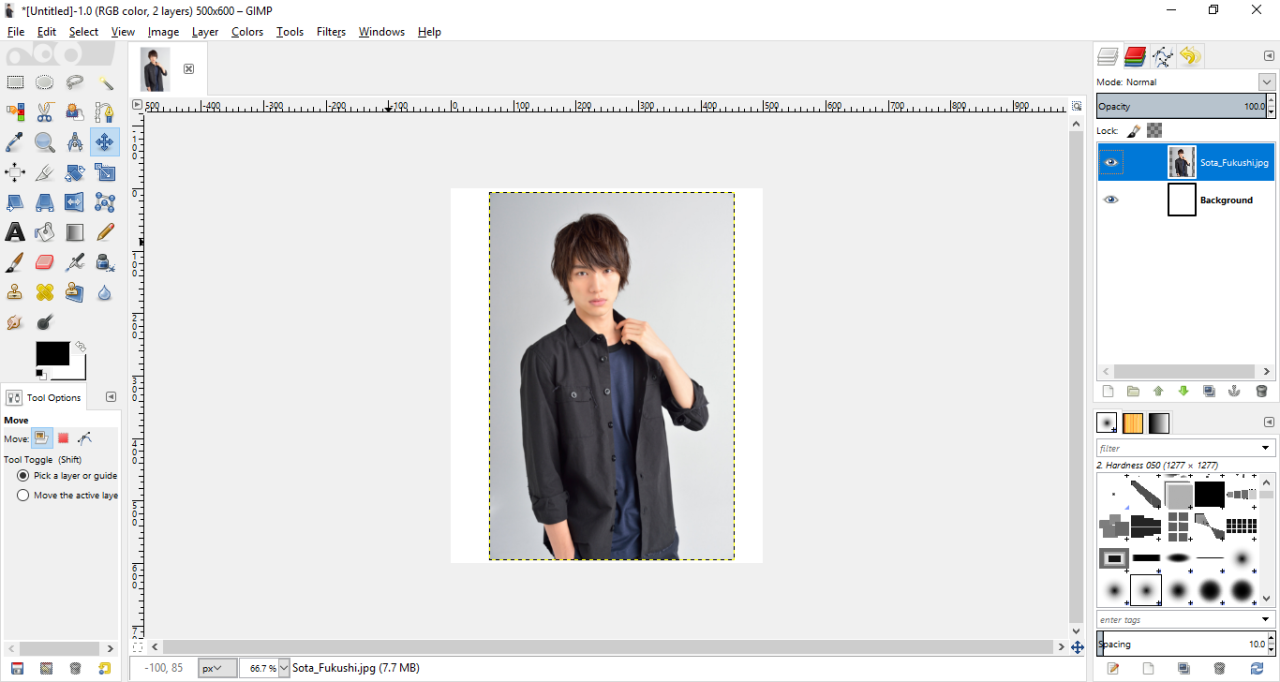
11. Move the Sota's photo. Make sure that white background can be seen at above and below the photo.
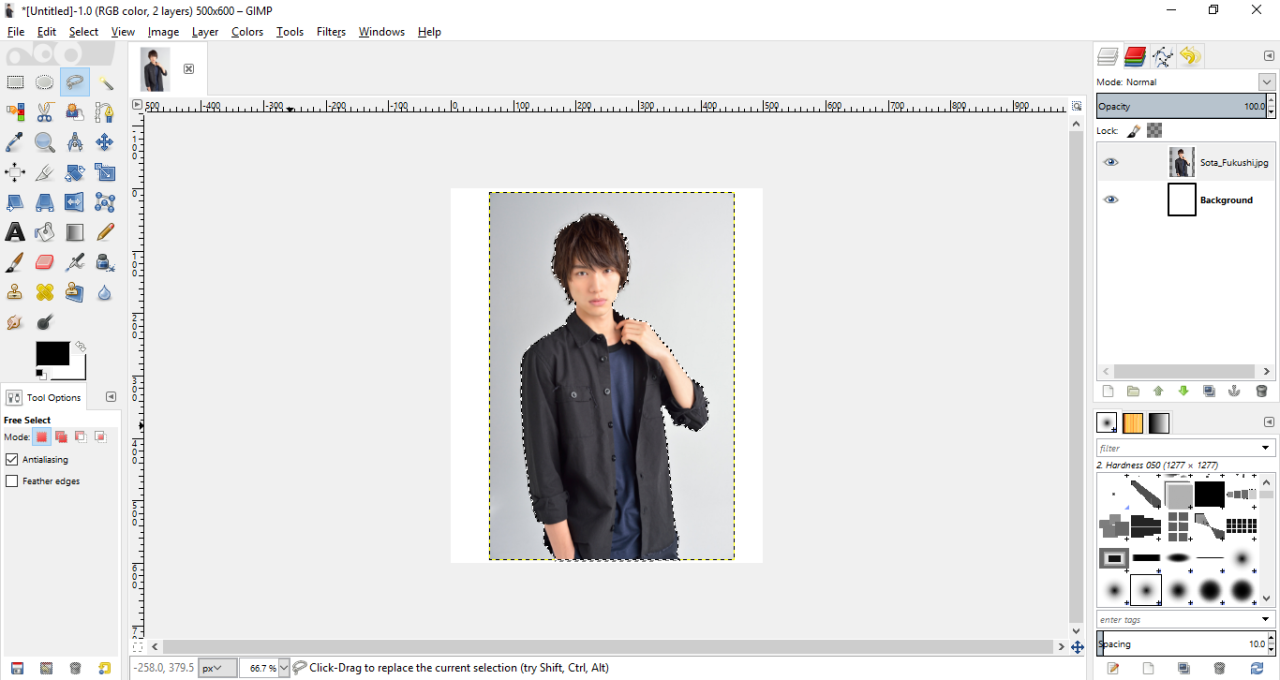
12. Now click on LASSO SELECTION tool. It is located at row no.1 and column no.3.
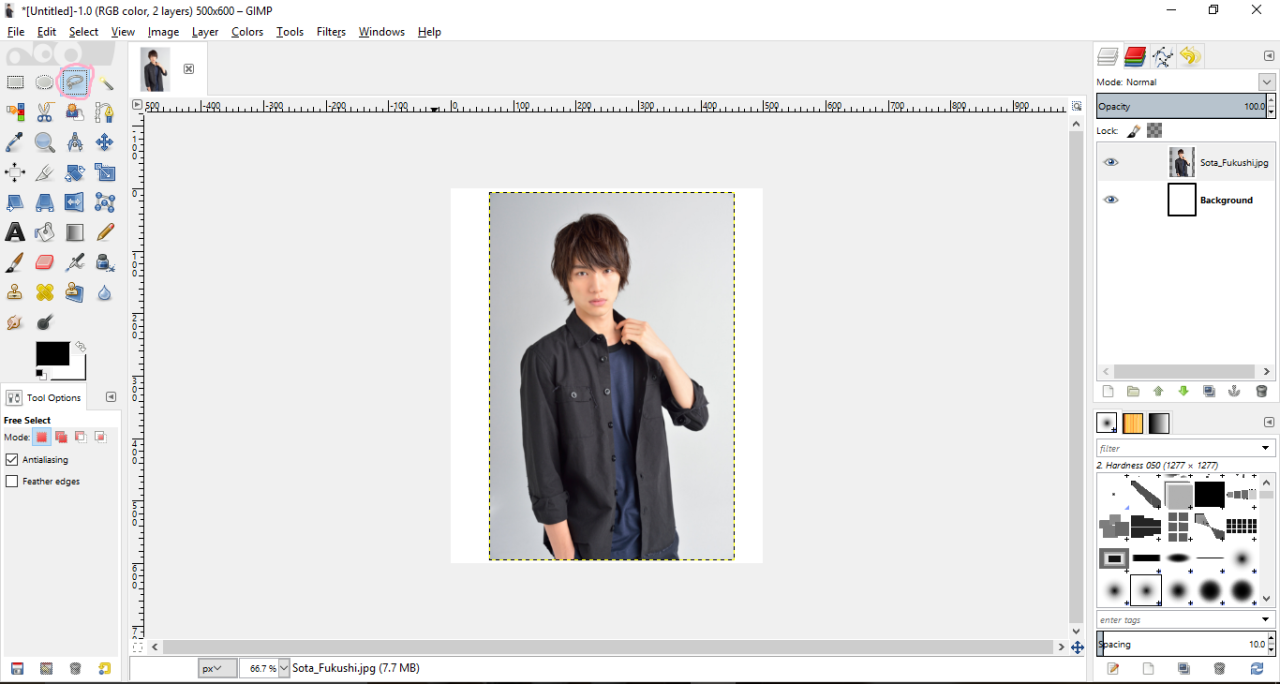
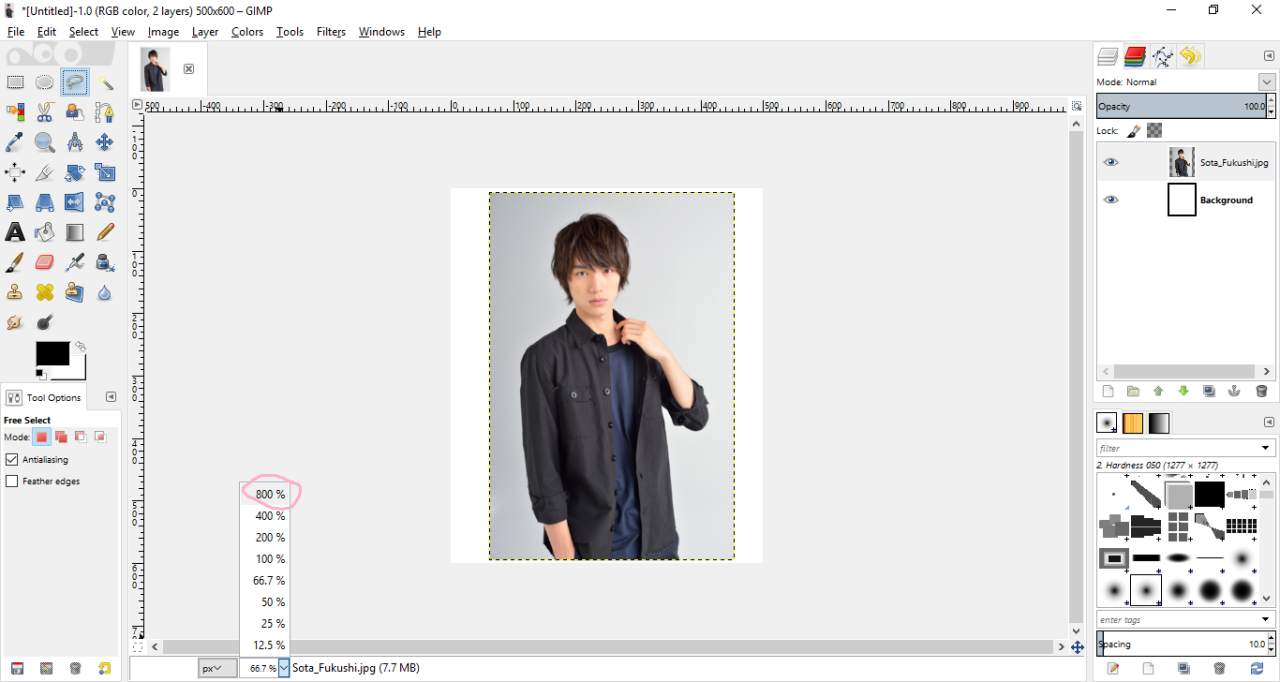
13. Before we can start with the selection, we will change the view from 66.7% to 800%. This is to make the result of cutting will look smoothly and no unwanted original background to be seen.
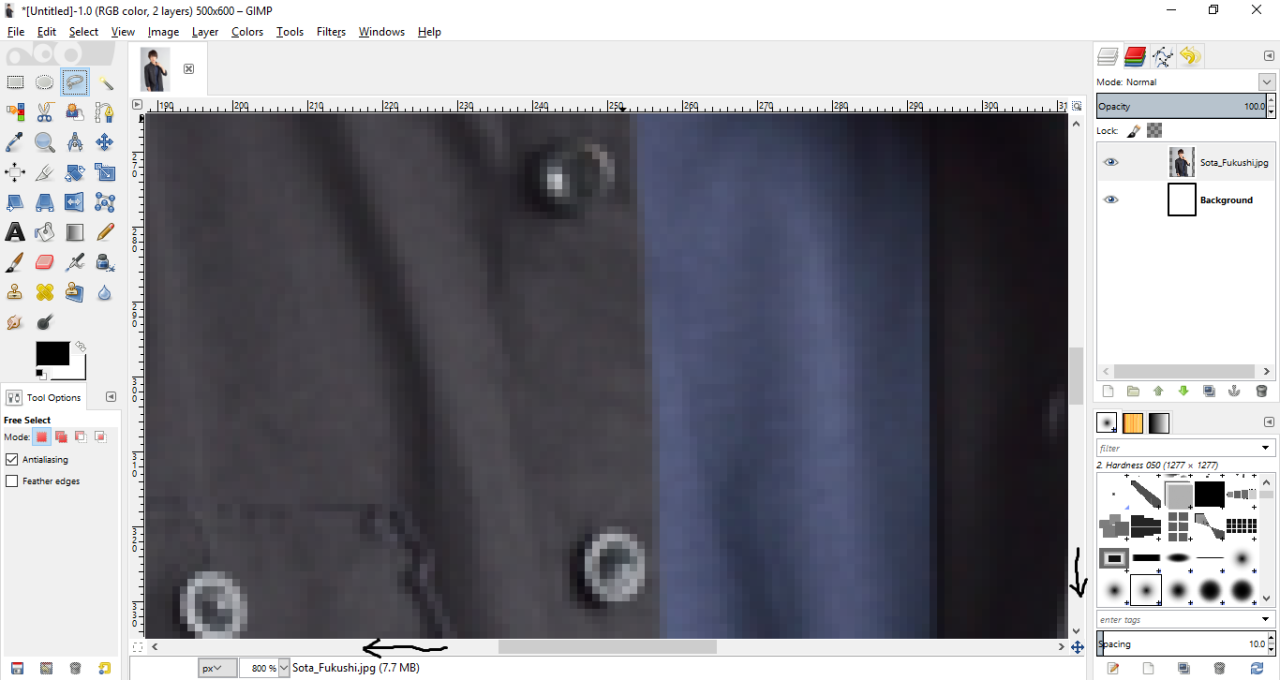
14. Zoom! Sota's photo will be so big haha. Now scroll down and scroll left until you find place where you can start the selection.
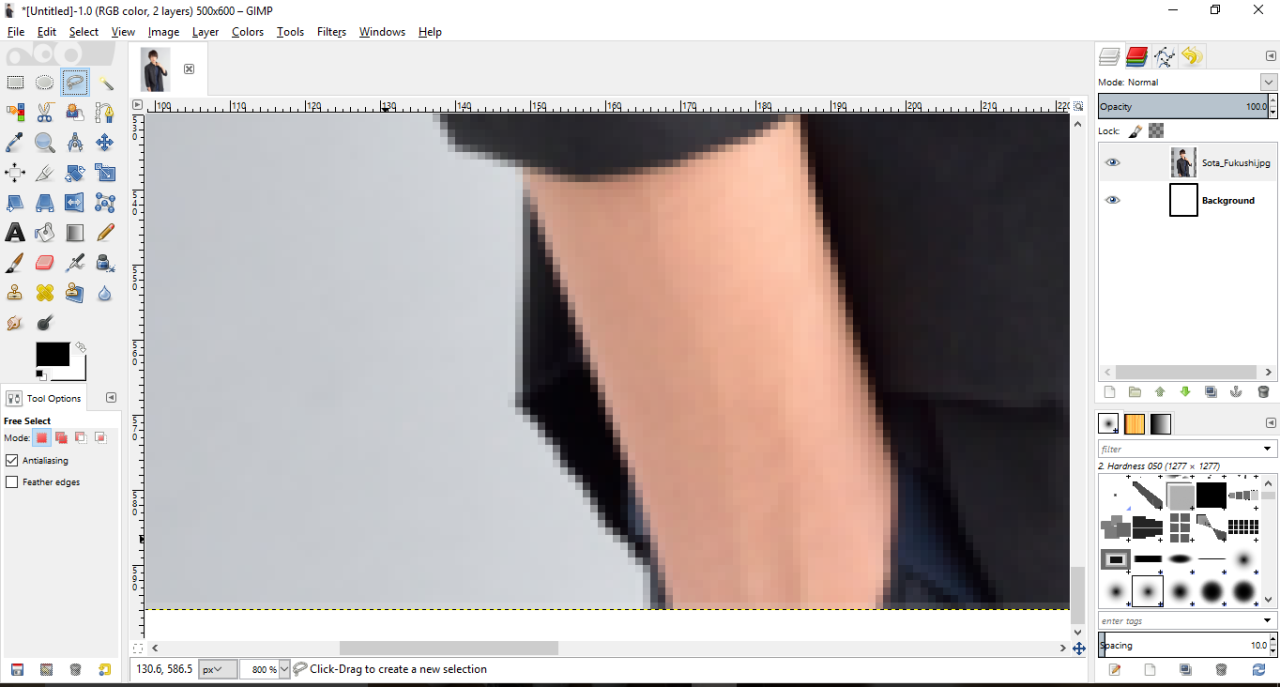
15. Start the selection from white background. Follow the Sota's body. As you see when I do the selection, a little part is outside the line. You don't have to worry because it won't affect the final result. This is why I change the view from 66.7% to 800%.
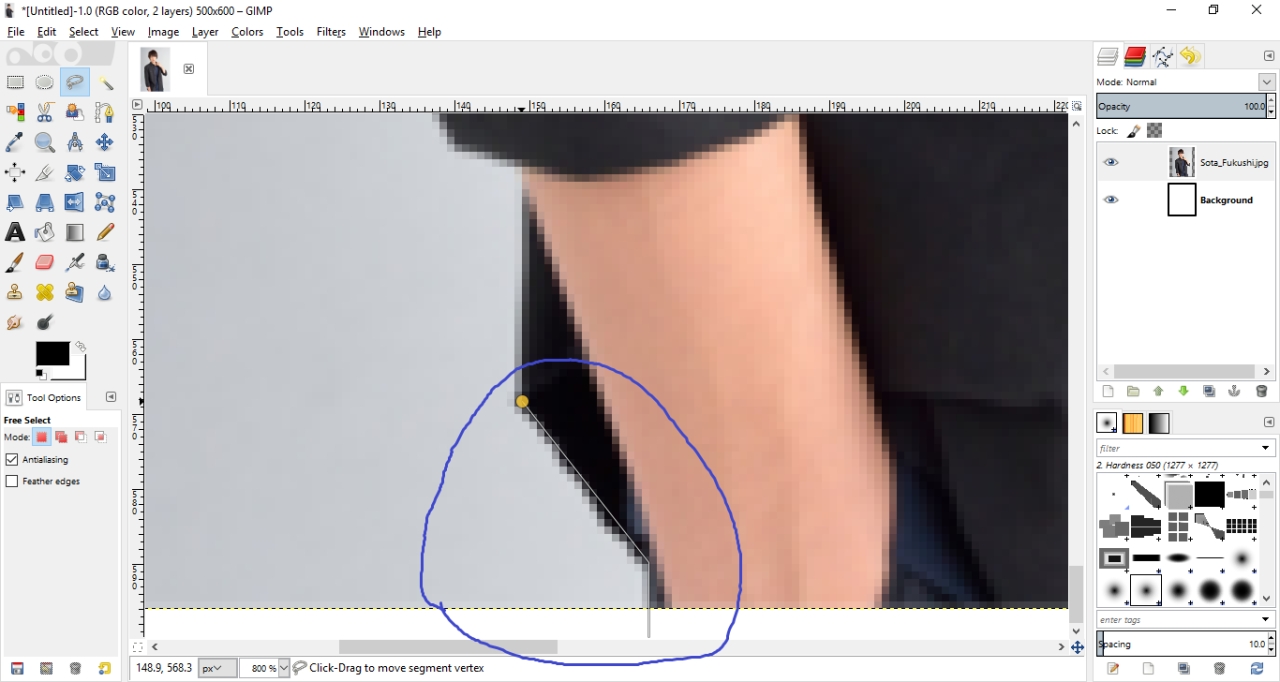
16. When you reach his hair it will be more complicated and harder to do the selection. You don't have to follow exactly all of his hair. Select the darker part.
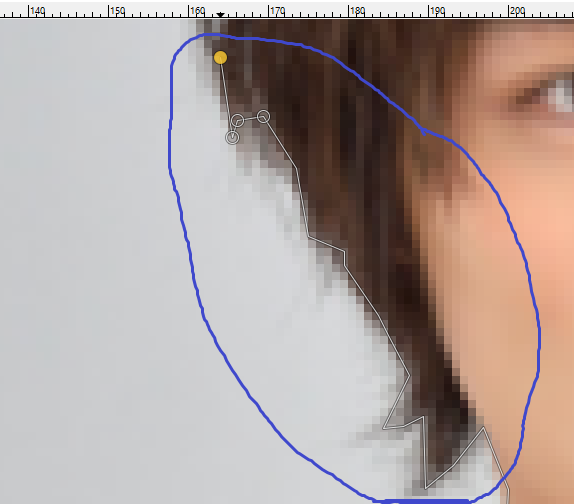

17. when you reach the end, go back to the place where you start the selection.
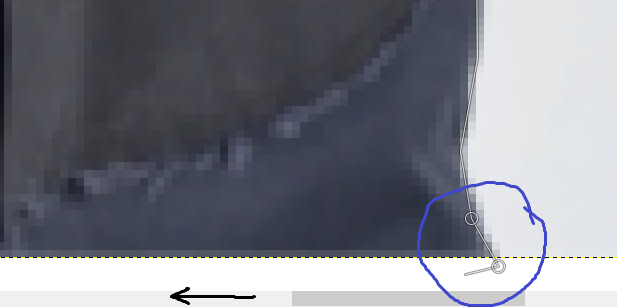
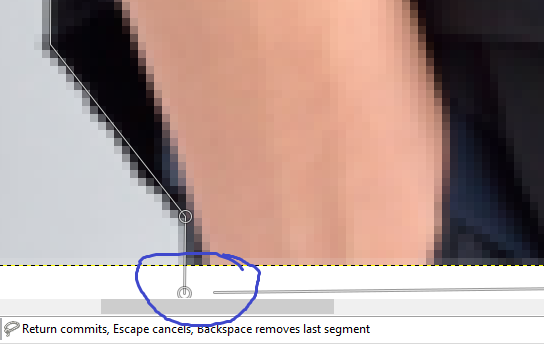
18. Meet the first circle (selection). Make them overlapped (The circle will be yellow). Click on the circle.

19. You can the selection by double clicking your mouse.
20. As you see there are moving dashed line along the selected line we did just now (In the screenshot it's not moving but in GIMP yes haha). Change the view from 800% to 66.7%.

21. It will look like this.
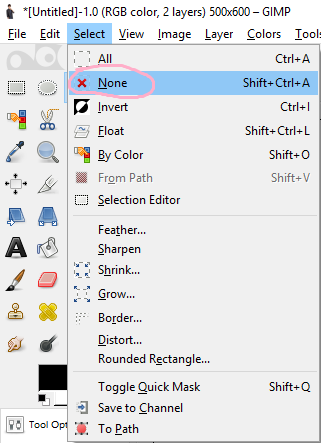
22. Then click on Select and then Invert. This is to make the part that we are going to cut/ remove is the background not Sota's.
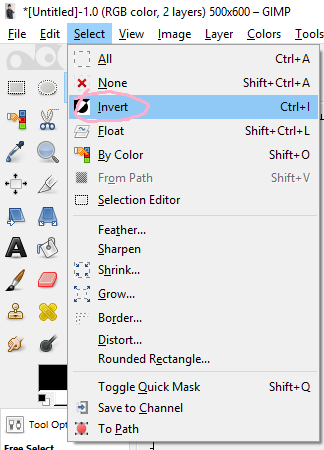
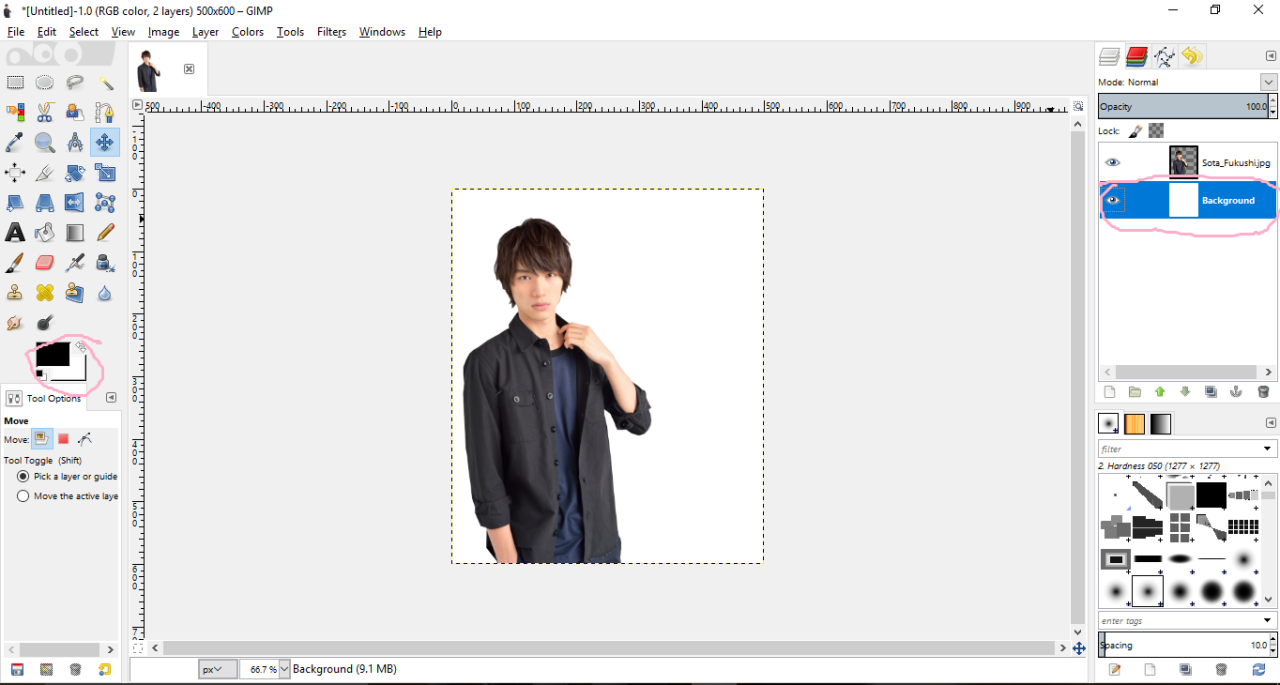
23. Now the moving dashed line is appear around the photo except at the lower part at Sota's body. This mean the selected area is the background not Sota's body.
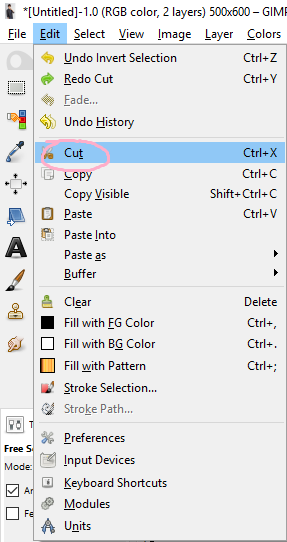
24. Click on Edit and then Cut. Yes we're going to cut/ remove the background!
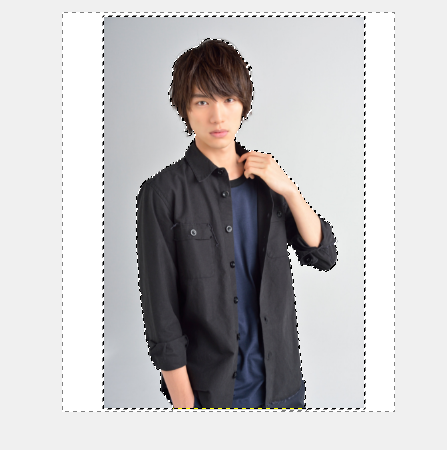
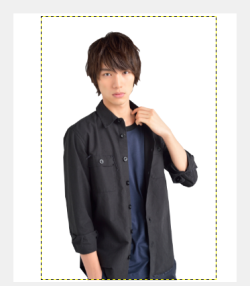
25. Tadaa the grey/ photo's background has been removed.
26. We are going to De-select everything. Click on Select and then None. It will look like in the 2nd screenshot.
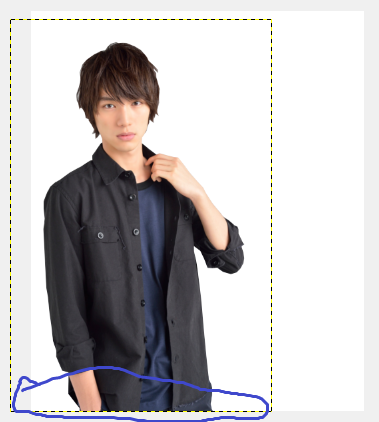
27. Now we are going to move Sota to make it look better. Click on Move tool and move Sota at about same as mine. Make sure Sota's body where had been cut (in original photo) is covered by move it lower. Move it until you can't see the white background below Sota's body.
EXTRAAAAAAAA!!!!! This is additional to make the edit look better.
28. It will look like this. Now click on background layer (I circled it). Then click on Black Square below the tools. We are going to change the background.
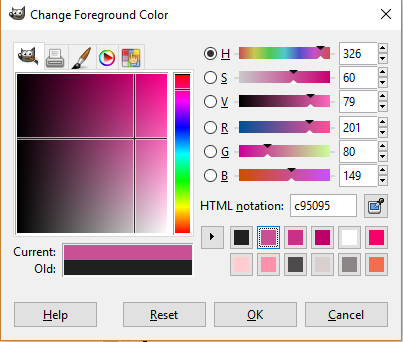
29. A new window will pop-up. Now choose the colour that you want as the background. If you want yours to be same as mine, change the HTML notation same as mine. Then click on Ok.
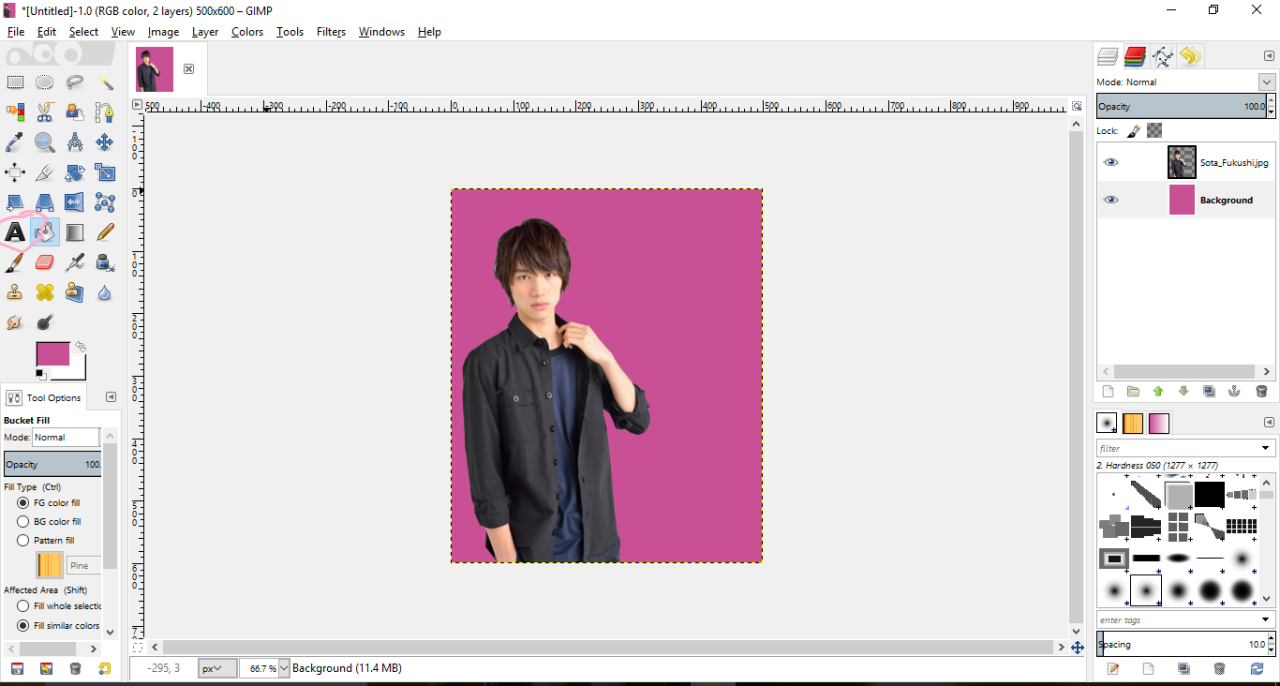
30. Then click on Fill Bucket. Then click on white background. The background will change from white to the colour that we have choosen in step 29. Btw the tool is located in row no.6 and column no.2. I forgot to circled it but you see the tool is in blue square because I already select it.
31. Now we are going to add some text. Click on Text. it is located in row no.6 and column no.1.
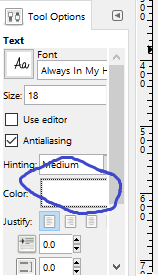
32. Click on the square beside Font and Sans. Then choose the font that you want. I'll choose Always In My Heart (the one we download and install in tutorial 2).
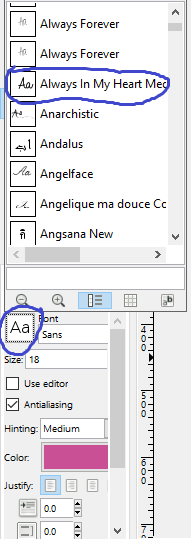
33. Change the colour of the font to white too. Click on the purple rectangle beside Color. Change it to white. In the photo I already change it to white.
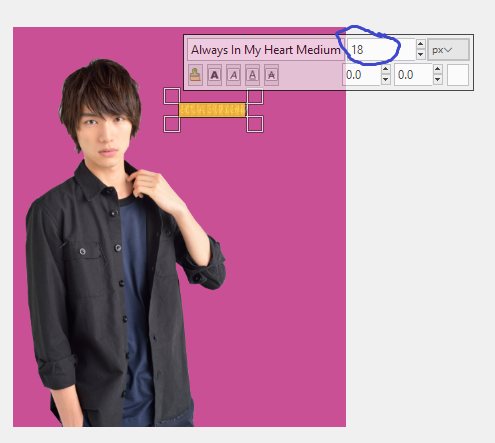
34. Then click anywhere at the purple background and start typing the name. I put Sota Fukushi because it is Sota's photo. As you see the font is too small. Increase the font size. I increase it until the size is about 43.
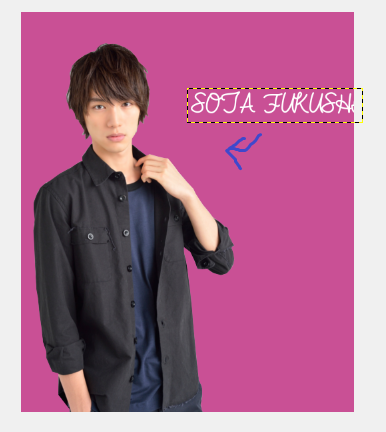
35. Now let's move the text. Click on Move tool. Be careful when moving. When you are try to move the text layer, make sure you click right on the letter (your mouse pointer will have the small move tool beside it). If you hover at the background your mouse pointer will have small move tool and a hand point to left. But it is depends on the layer you select. If you dont understand it is fine. Do it slowly.
36. Then you can add anything that you want like your credit. Then save when you have finished. If you don't know how to save it in PNG file format, go to tutorial 3. This is my final result.

Yayyy new graphic tutorial!!! Sorry for late because this is pretty long so it took me times. In next graphic tutorial i am thinking to make a simple romcom poster or teach you guys on blending Btw anybody want renders!!! If yes comment. I'm thinking to make some renders. By the way last time i told to you guys that I have my qualification test of institute for driving. and yes i pass it and my actual test with road transport department, known as JPJ in my country is on 26.2. If I pass in the test I will my driving license. I am so excited yet nervous haha. Back to our tutorial. That handsome guy is Sota Fukushi one of the popular in Japan and he's my favourite, my no.1 Japanese actor x3. watch his film like As the God's Will, Tomorrow I Will Date With Yesterday's You and Strobe Edge.
Like I promise in previous chapter, today I teach you on how to cut in GIMP. This is the basic in graphic designing. Cutting is useful when you want to make a romcom poster unless you already have the character's render. Before we start download the photo below. If you want to use your own photo also allowed as long as the background is simple and easy for you to do the cutting. BTW WARNING THIS TUTORIAL WILL BE SOOOOO LONG BECAUSE THERE ARE MORE THAN 30 SCREENSHOTS I MADE xD.
(His name is Sota Fukushi, my fav japanese actor <3~ )
1. Open your GIMP.
2. Now click on File then New.
3. A new window will pop-up. Now set the width to 500 and height to 600. Then, click on Ok.
4. You will get a white background like this.
5. Now click on File again, choose Open As A New Layer.
6. A new window will pop-up. Go to the folder where you saved Sota Fukushi's photo. (If you use your own then go to the folder where the photo is saved in). Click on the photo and then click on Open.
7. The photo will be open as a new layer on top of the white background. Since the photo is bigger than the background and some part are not shown, we will resize the photo. Click on SCALE tool (I circled it. If you don't see it, the tool is located in row no.4 and column no.4.
8. A new window will pop-up. Now decrease the width/ height. BUT! Before resize it, do close the chain or else when you decrease the width, you have to lower the height by your own. If the chain is closed, when you decrease the width, the height will be automatically decrease too.
9. I resize the photo to this size. If you use your own photo, resize the width and height to be lower than the background. Now click on Scale.
10. You will get like this. As you see, the photo is went a little upper and Sota's face cannot be seen. Now we will move the photo so that it will be right in the background. Click on MOVE tool. The tool is located in row no.3 and column no.4 (above the SCALE tool).
11. Move the Sota's photo. Make sure that white background can be seen at above and below the photo.
12. Now click on LASSO SELECTION tool. It is located at row no.1 and column no.3.
13. Before we can start with the selection, we will change the view from 66.7% to 800%. This is to make the result of cutting will look smoothly and no unwanted original background to be seen.
14. Zoom! Sota's photo will be so big haha. Now scroll down and scroll left until you find place where you can start the selection.
15. Start the selection from white background. Follow the Sota's body. As you see when I do the selection, a little part is outside the line. You don't have to worry because it won't affect the final result. This is why I change the view from 66.7% to 800%.
16. When you reach his hair it will be more complicated and harder to do the selection. You don't have to follow exactly all of his hair. Select the darker part.
17. when you reach the end, go back to the place where you start the selection.
18. Meet the first circle (selection). Make them overlapped (The circle will be yellow). Click on the circle.
19. You can the selection by double clicking your mouse.
20. As you see there are moving dashed line along the selected line we did just now (In the screenshot it's not moving but in GIMP yes haha). Change the view from 800% to 66.7%.
21. It will look like this.
22. Then click on Select and then Invert. This is to make the part that we are going to cut/ remove is the background not Sota's.
23. Now the moving dashed line is appear around the photo except at the lower part at Sota's body. This mean the selected area is the background not Sota's body.
24. Click on Edit and then Cut. Yes we're going to cut/ remove the background!
25. Tadaa the grey/ photo's background has been removed.
26. We are going to De-select everything. Click on Select and then None. It will look like in the 2nd screenshot.
27. Now we are going to move Sota to make it look better. Click on Move tool and move Sota at about same as mine. Make sure Sota's body where had been cut (in original photo) is covered by move it lower. Move it until you can't see the white background below Sota's body.
EXTRAAAAAAAA!!!!! This is additional to make the edit look better.
28. It will look like this. Now click on background layer (I circled it). Then click on Black Square below the tools. We are going to change the background.
29. A new window will pop-up. Now choose the colour that you want as the background. If you want yours to be same as mine, change the HTML notation same as mine. Then click on Ok.
30. Then click on Fill Bucket. Then click on white background. The background will change from white to the colour that we have choosen in step 29. Btw the tool is located in row no.6 and column no.2. I forgot to circled it but you see the tool is in blue square because I already select it.
31. Now we are going to add some text. Click on Text. it is located in row no.6 and column no.1.
32. Click on the square beside Font and Sans. Then choose the font that you want. I'll choose Always In My Heart (the one we download and install in tutorial 2).
33. Change the colour of the font to white too. Click on the purple rectangle beside Color. Change it to white. In the photo I already change it to white.
34. Then click anywhere at the purple background and start typing the name. I put Sota Fukushi because it is Sota's photo. As you see the font is too small. Increase the font size. I increase it until the size is about 43.
35. Now let's move the text. Click on Move tool. Be careful when moving. When you are try to move the text layer, make sure you click right on the letter (your mouse pointer will have the small move tool beside it). If you hover at the background your mouse pointer will have small move tool and a hand point to left. But it is depends on the layer you select. If you dont understand it is fine. Do it slowly.
36. Then you can add anything that you want like your credit. Then save when you have finished. If you don't know how to save it in PNG file format, go to tutorial 3. This is my final result.
Yayyy new graphic tutorial!!! Sorry for late because this is pretty long so it took me times. In next graphic tutorial i am thinking to make a simple romcom poster or teach you guys on blending Btw anybody want renders!!! If yes comment. I'm thinking to make some renders. By the way last time i told to you guys that I have my qualification test of institute for driving. and yes i pass it and my actual test with road transport department, known as JPJ in my country is on 26.2. If I pass in the test I will my driving license. I am so excited yet nervous haha. Back to our tutorial. That handsome guy is Sota Fukushi one of the popular in Japan and he's my favourite, my no.1 Japanese actor x3. watch his film like As the God's Will, Tomorrow I Will Date With Yesterday's You and Strobe Edge.
Layout by minocha99 | 2017

To all subbies~~ Finally i'm back! My semester break has start since last two weeks but i was busy and just got my free time. I'm not sure how many updates i can make. But I try my best to update as many as i can. I haven't finish my render too. I just try to finish it as soon as i can.
Comments