•The Pixlr Basic Tools•
•The Pixlr Tutor's Place•
Okay, so on with the boring but essential basics. Let's start with the starting page.
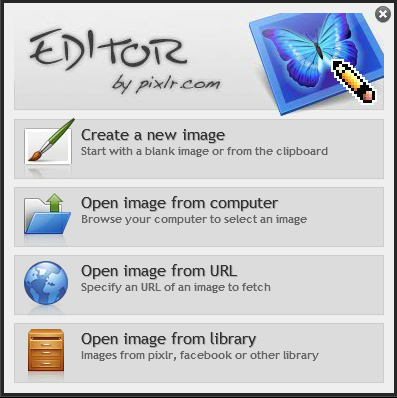
Easy. Create a blank image (many, many options-try explore that), open image from computer, open image from URL (for those out there that started out like me-don't know what that means-it means pics that end with .jpg, .png, .jpeg, etc.), open image from library (read the bottom). Simple as that.
Next is the tools. Take a look.
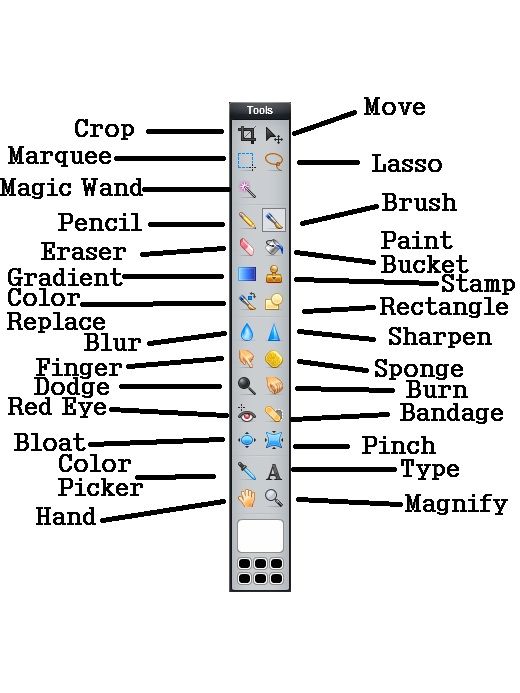
Those are the names, by the way.
Crop: Easy peasy, lemon squeezy. Crop means to, well, crop. You use the mouse to 'highlight' the place you want left, then simply just click somewhere else. It will say something like, "Do you want to crop?" or "save this crop?" Click yes. Viola, you've cropped.
Move: You move the picture. Unfortunately, you can't do that with the starting pic because it's the background. Unless you duplicate and-oh, I'll do that later. Click and drag.
Marquee: It's just boxed lasso. You use the mouse to once again make a square/rectangle to select a spot. What's useful about both lasso and marquee is that you can do that over a specific area and sloppily erase. Then, only the lasso'd or marquee'd part will be erased.
Lasso: Freestyle marquee. You can also do that weird sticky one, but I've no idea how to explain. Later, I guess. Click and drag.
Magic Wand: If you're like me at the beginning, then you have no idea what this is. If you do, skip. If you don't, read on. Magic wand is like you just click, and the part will be lasso'd automatically. You can also right-click and invert selection, which means to select everything else but what you've originally selected. But be careful-this doesn't always work out really great.
Pencil: Simply freestyle drawing. There is other options for this. Explain later. Click and drag.
Brush: Like pencil, but a bit different. Lots of sizes and styles, as you can choose, and stuff like that.
Eraser: Erase with this.
Bucket: You fill in stuff with one color here, like you're pouring a bucket of paint or something to one specific place. But if the space you want to color has different colors in them, be careful-it only fills in one color at a time. Use a type of marquee and brush for those.
Gradient: I barely use this, but if you use it, the whole feeling of any graphic can become different. It's hard to explain, though, so try experiment with that one. One piece of advice, though-when I first used it, I had no idea what it was. I thought all it did was, well, turn the whole thing black and white. So something I learned-don't use it with the opacity at 100. Use the slider (I'll explain) to change it to less than 50 pretty much.
***SLIDER***
The thing I call slider is this:

You basically just slide it with your mouse. Super simple and super user-friendly.
Stamp: It'll tell you what to do. Ctrl-Click to create the stamp, then click anywhere else and drag how much you want copied.
Color Replace: Replaces color. Use your mouse.
Rectangle: You draw shapes by dragging your mouse.
Blur: Blurs. Drag your mouse. You can change the options by that little gray bar thing on top.
Sharpen: Sharpens. Same as blur-drag your mouse. Good for angst posters.
Finger: Super, duper, duper blurs. It kind of mixes in everything like a finger on a wet painting. Use mouse, drag.
Sponge: It kind of acts like it's soaking up color. Confusing? Well, you see, the colors usually gets brighter. Drag mouse.
Dodge: Kind of pales the picture, should I say? I'll explain later. Drag mouse.
Burn: This is what I call the opposite of Dodge. Instead of paling, it darkens, like it's kind of been burn. I'm saying 'kind of' a lot, huh? :( Sorry. Drag mouse.
Red Eye: I have no idea how to explain this. I basically never use this. It changes the color red to kind of a dark gray-ish color. If you know, tell please! Click.
Bandage: Once again, never used this, and I have absolutely not a clue. You drag, and it looks kind of white. Let go, and it turns speckled and stuff. Great for angst posters, I guess, but I never used. Try it out.
Bloat: Basically makes stuff bigger-but only that. Click.
Pinch: Opposite of bloat-makes it smaller, but again, only that. Click.
Color Picker: You pick up the color. See that little white box with little black squares under it? Well, that's the colors. Using the color picker, you get to pick a color already on the poster or on another page. It's really simple and it's really nice. I'll explain later. Click.
Type: As it says, type. You type, type, and type. There's more to it, though. I'll explain, again, later. Click to first determine the spot to type. Then, you can click and drag later.
Hand: You move your view around when you've magnified the picture (see below). Click and draaaaaag.
Magnify: Click, and you'll be magnifying your picture! Use the hand (see above) to move around your view.
So that's it for basic tools. I'll explain more specifically later in life (where hopefully you guys will be there). Questions, ask below on the comment section. Thanks.
Comments