[TUTORIAL] Quick, Simple Blendish, Cute Poster [GIMP]
♚ Pandromeda♥Designs ┇ 2nd Poster & Trailer Request Shop ♔ [CLOSED]
Design a Blending Poster
FOR THIS TUTORIAL YOU WILL NEED...
Pictures of the characters.
Textures
Patterns
Brushes
GIMP
[For this tutorial, I'll be doing a poster for My Only One, starring an OC and Infinite's Myungsoo.]
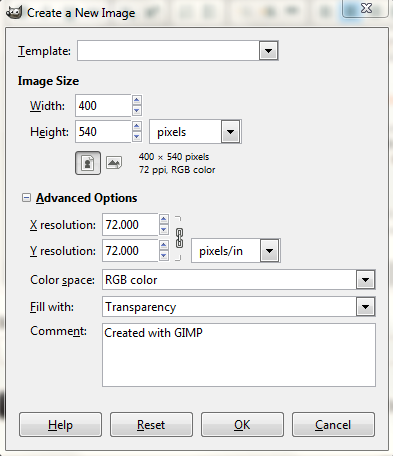
01. Starting with 540x400 for a portiat type of poster is commonly used. But if you want to use a landscape type, just use 400x540 or any sizes you think will fit. I used 540x400. Click on advance options and click on Fill With: and change it to transparency. Transparency is easier when you're editing or cropping. Leave the other boxes alone. Click ok once you're finished.
02. Reminder! Don't put in your background yet! You can if you want. Before starting, try by finding two pictures that have either one background or a colorful background. Try to find pictures that match the mood/theme of the poster. For My Only One, it is a romantic, but cute story, so I will use these two pictures.

03. Open your pictures on GIMP and copy and paste them onto the poster part. You may need to resize your pictures. (Warning: when you resize pictures that are below 300x400, your picture may become blurry. Try to find another picture that is bigger and pictures that are HQ. Sometimes, pictures that are bigger than your actual poster size will have perfect quality.) Its okay if your pictures are overlapping. You'll be erasing part of the backgrounds later.

04. Right click on your pictures and click on Add Layer Mask. Your layers box should have something like this.

05. Go to your toolbox and click on the brush icon. Change the opacity to 55%. Choose a brush that is the shape of the circle. You can change your brush size at the Scale. Try to 'erase' around the edges of the person. (If you have a picture that is in your way, go to the layers box and click on the eyes on one of your layers.)

06. Do the same thing with the other picture and add the other picture back.

07. Now you can add colors and brushes to your poster! Make sure your backgrounds and colors match the mood/theme of the poster. You can adjust your picture's opacity at the layers box.

08. Add a new layer. Make sure it's the very top of all your things. Choose a texture that you have, or at the resources we gave you, or at the patterns at GIMP gave you. You may use up to 3 textures. (Using a lot of texture will ruin your poster)
Your own texture & our resourses = Open your texture in a new project. Copy and paste it onto your poster. Change the Mode to Multiply and change the opacity to 55%.
GIMP Patterns = choose a pattern and add a new layer. Click on the paint can and click on the Pattern Fill. Click on your poster and you'll get a solid look of your pattern. Go to the layers box and change the mode to Multiply and the opacity to 55%.
For the next layers, repeat the first 3 steps above and choose your own mode and opacity.

09. Now add the texts and extra things that you need!

10. Now you're finished! Save your image in .xcf and save again (Ctrl+Shift+S) in .jpg. Save quality to 100%, And for your final result...
Hope this tutorial isn't as hard. Any questions, just ask!
- ljoeholic
Comments