layout tutorial [check it out !!]

TreeHouse ¦ -bluepills


" feels as if you're home "
Characters: OCs and Idols
so I'm going to teach you how to do the layout above ↑
[it's not completely a layout, because I'm not a pro, sorry]
STEP 1: make a blog, story, chapter/etc.
STEP 2: search for a picture that will really suit the theme or the story. I searched in Google Images, I wrote 'treehouse tumblr' and when I scrolled down and found what picture I like, I right-clicked on the pic and clicked 'open in new tab' to see if it's hd and not blurry or has a watermark.
this is the picture I used in the given layout above
STEP 3: copy it's url,
how? if you're using
Google Chrome - right-click on the pic, then click 'Copy Image Url'.
Mozilla Firefox - right-click on the pic, then click 'Copy Image Location'.
Internet Explorer - right-click on the pic, click 'Properties', then copy the 'Address(URL)'.
if you're using a different browser, then just search for a guide in 'Google'.
STEP 4: Go back to your blog/story/chapter, click your desired alignment (left, right, justify, or center) how? just click these icons  , you can press Enter as many as you want to adjust where you want the pic to be high or low. I just press Enter once.
STEP 5: Click the Image icon. Search it on the tools above, if you can't find it, it looks like this  , then paste the url in the 'URL' box. Before clicking 'OK', wait until the picture appears in the 'Preview'. You can see that there's a 'Width' and 'Height'. You can change this numbers, although they always interfere with each other, if you want to change it to your desired width and height for your picture, click the
  and it would change into
  , it would be better if the width won't go over 700, cause it won't look good. In the layout I've made above, I made the width 400 and height 266. Make the picture big, since it's the main picture.
STEP 5: Now, that we have the main picture, press Enter, write the title of your story or the story you're advertising, the title I used is 'TreeHouse', you can also write the author of the story, separate the title and the author's username by adding a symbol in the middle, where can you find the symbols? just click the symbols or special characters icon in the tools above, it looks like this  , then pick what symbol you like to add. I used the broken bar symbol, it look like this ¦ . Before I almost forgot, set the font and size you like for your text, I used georgia as the text font, and the size is 12. Oh, and also the text color and background color. Click the text colour icon and the background colour icon in the tools above, it looks like this
  and this
  . I used white as the text color and peach pink as the background color.
STEP 6: Now that we have the main picture and the title & author, we need the little pictures, or more likely to be called icons. First, click enter. Just do what we did to the main picture, except for the size, make it proportional, by using the same number for the width and the height, make sure the ratio is unlocked, this .
These are the pictures and gif I used for the icons. I made their width and height 100, so they will look like icons.
Before you click ok, set a border-width, how? just put your desired border-width in the 'Border' box, you can see the result in the 'Preview'. In the layout I made, the border-width is 1. You can also change the border color, highlight the pictures, click the text colour icon, this , then pick the color you like, and click 'OK'. I used the color light brown in the layout.
STEP 7: Press enter again. Here is where you can place the story's summary, motto, etc. Change the text-font, font color, and font size. You can also change it into bold, italic, or underline, by clicking these icons  in the tools. I used italic for the layout above.
STEP 8: Press Enter [again]. Here is where you can place the characters in the story. But before writing it, you can adjust the indent by clicking these icons  in the tools. Just like in 'STEP 7', change the text-font, font color, and font size. I used white as the font color, text-font is georgia, font size is 12. I also add a background color, I used light brown for it.
STEP 9: Now, this step is optional, it will just guide you if you want to change the icons' border-styles, if you don't wanna, then go on to the next step. Ok, let's start by clicking on the 'Source' icon in the tools. It's on the upper-left, and looks like this  . Once you click it, you will see a bunch of letters and numbers. Look for the border-styles, this -
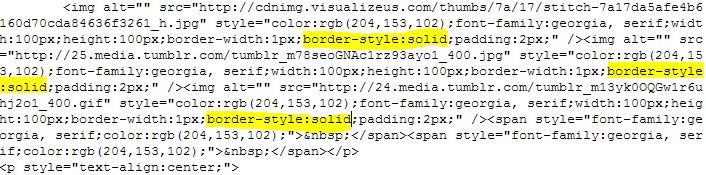
You should change the 'solid' word into another border-styles.
here is a list of border-styles:
dotted
dashed
double - to see this border, the border-width should be 4 or over.
inset
outset
ridge
hidden or none -this two is not really great, since you won't see the border at all.
You can also add them together, like dotted soild or dotted solid dashed double, but the limit is four, since every picture only has four sides, like a box. You can go HERE if you want to try out the border-styles.
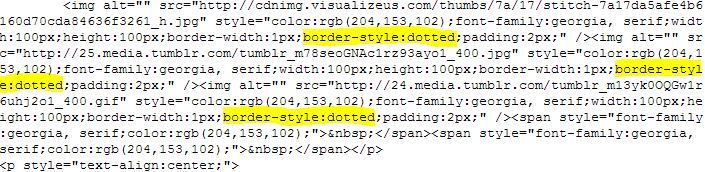
As for me I changed the border-style to dotted, like this -
You can also see that I add a padding, what's a padding? it's the space between the picture and it's border, you can also add a padding in yours, but it's your choice. It would be like this -
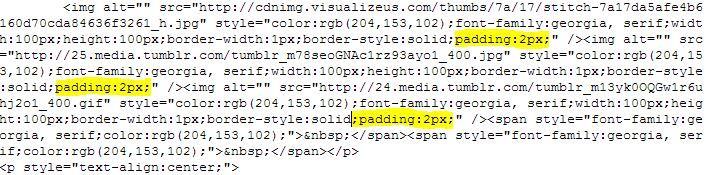
I made the padding 2, you can change it to whatever number you want.
STEP 10: Now that the text and pictures are up, the border's are changed. All we need is to edit the source code, so the title and author and the icons will look like it's on the main picture. Ok, let's start by clicking on the 'Source' icon in the tools. It's on the upper-left, and looks like this . Once you click it, you will see a bunch of letters and numbers. Look for this -

It's easy to find, since it's just in the upper part. You can see the link/url of the main picture here -

And it's width and height -

Here we can add the margin, which will help us with the effect where the title and author's username and the icons to be on the main picture, we will put the margin after the width and height, like this -

I made the margin -160, because it will make the effect looks great, you can change this number into -150, -100, -200, whatever you want, but never forget to make it negative, the higher the negative number, the lower the main picture will go and the other below it will go up(title, author's username,icons). If you make it a positive number then the main picture will go up and the others (title, author's username,icons) will be blocked by the main picture.
Just make sure you put it after the width and height, and inside/between this -

Ok, now click the 'Source' icon again, this . Look at the result of all your hardwork. If you want to change anything you can. Anyways, the story I used in my layout is THIS, please check it out.
Ok, I think that's all. Thanks for reading my tutorial, even though it's kinda confusing, I hope it helped you somehow.
By the way, if you want to hyperlink something, just click this icon  in the tools, then paste the link in the 'URL' box. After hyperlinking the word, you can change it's color to whatever you like. You can hyperlink, not just words, but also pictures or even gifs, just highlight the picture, then click this and paste the link in the 'URL' box.
If you need to ask anything or if I missed something, please comment, write on my wall or write a pm to me. If you want to advertise your story or shop, then go HERE, it'll open around the last week of July. You can also apply as an advertiser there. Please do.
This is for my friend, naa a.k.a. -bluepills..^^ Did you like it? If you want any assistance in something, just ask, I'll help you, although I'm not a pro, but ask first if I know it, if not then unfortunately I can't help..
Comments