[TUTORIAL] Making PSDs + Freebie PSD
REPOST FROM DUO RESOURCE CENTER BATCH 2
TIP-TALK-TUT THURSDAY
8/22/13: tutorial on making psds
requested by fantasticmonster and masteroffanfics
requested by fantasticmonster and masteroffanfics
today i'll only show you the very very very basic foundation in making psds. this should be enough to get you going with making many different psds though. i will go into more details and methods later if you want. tell me what you think, alright?
--PALAMA
-----------------------------------------------------------
-----------------------------------------------------------
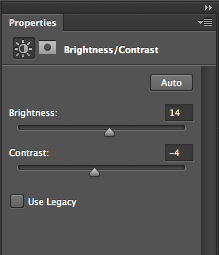
adjustment basics: light & shadow
brightness/contrast
brightens & darkens images; increases/decreases contrast
brightens & darkens images; increases/decreases contrast
levels
changes the brightest and darkest tones of your image; adjusts overall tone brightness of your image
changes the brightest and darkest tones of your image; adjusts overall tone brightness of your image
curves
highlights shadows and light; add shadow or light to your image
highlights shadows and light; add shadow or light to your image
exposure
adds or take away light; adds whiteness or blackness
-----------------------------------------------------------
adds or take away light; adds whiteness or blackness
-----------------------------------------------------------
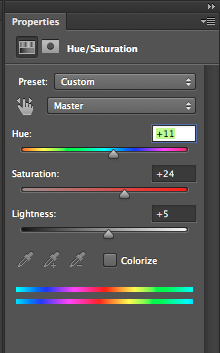
adjustment basics: colorization
vibrance
adds or removes colors of your image; adjusts intensity of colors
adds or removes colors of your image; adjusts intensity of colors
hue/saturation
controls overall hue/color tones of your image, intensity/saturation, and lightness
controls overall hue/color tones of your image, intensity/saturation, and lightness
color balance
controls color tones of highlights, shadows, and midtones of your image
controls color tones of highlights, shadows, and midtones of your image
black and white
obviously desaturates your image and turns it black and white
obviously desaturates your image and turns it black and white
photo filter
adds a tinge of color of your liking to your image
adds a tinge of color of your liking to your image
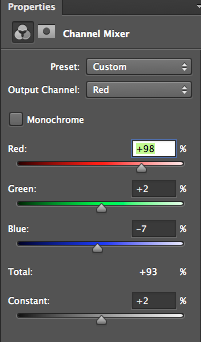
channel mixer
allows you to adjust reds, blues, and greens (also called channels); these three colors/channels mix and overlay each other to make up the different colors of the image
-----------------------------------------------------------
allows you to adjust reds, blues, and greens (also called channels); these three colors/channels mix and overlay each other to make up the different colors of the image
-----------------------------------------------------------
adjustment basics: OTHER FUNCTIONS
selective color
adjusts the percentage of colors and their undertones present in your image
adjusts the percentage of colors and their undertones present in your image
gradient map
adds gradients into the image rather than on top of the image (that is what the gradient tool does). gradient map interlaces gradients with other adjustments
adds gradients into the image rather than on top of the image (that is what the gradient tool does). gradient map interlaces gradients with other adjustments
*this function requires the use of blending mode*
color fill: solid color
simply acts as a solid color layer--nothing too special about it
simply acts as a solid color layer--nothing too special about it
•this function requires the use of blending mode*
THERE ARE OTHER FUNCTIONS I'VE NEVER USED BEFORE, SO I DON'T KNOW WHAT THEY DO, SO I DID NOT INCLUDE THEM AT ALL IN HERE. FEEL FREE TO TEST AROUND.
-----------------------------------------------------------
-----------------------------------------------------------
APPLYING YOUR KNOWLEDGE
STEP 1: OPEN YOUR IMAGE
resize/crop if you need to. i used this photo of yoo in na and resized it to 400x400.
resize/crop if you need to. i used this photo of yoo in na and resized it to 400x400.
STEP 2: ADD A NEW ADJUSTMENT LAYER (LAYER > NEW ADJUSTMENT LAYER) OR COLOR FILL LAYER (LAYER > NEW FILL LAYER > COLOR)
I added the following adjustments (in the exact order posted)

I added the following adjustments (in the exact order posted)
STEP 3: MESS AROUND WITHIN THE FUNCTION AND ADJUST TO YOUR LIKING. CHANGE THE BLENDING MODE AND OPACITY IF YOU'D LIKE
i then added a color fill of #b8cfdb and duplicated that layer. set the first fill layer to color burn 95% opacity, the second fill layer to soft light 70%.
i then added a color fill of #b8cfdb and duplicated that layer. set the first fill layer to color burn 95% opacity, the second fill layer to soft light 70%.
STEP 4: REPEAT STEPS 2 and 3 UNTIL YOU'RE SATISFIED WITH THE RESULt
*note: you don't have to use all the adjustments; you can use them in any order; you can use the adjustments more than once; feel free to mess around and go wild*
*note: you don't have to use all the adjustments; you can use them in any order; you can use the adjustments more than once; feel free to mess around and go wild*
STEP 5: PLACE ALL THE ADJUSTMENT LAYERS YOU'VE CREATED IN A FOLDER
step 6: save for file in photoshop file (psd)
*note: you might want to test your psd on other images before reaching final result*
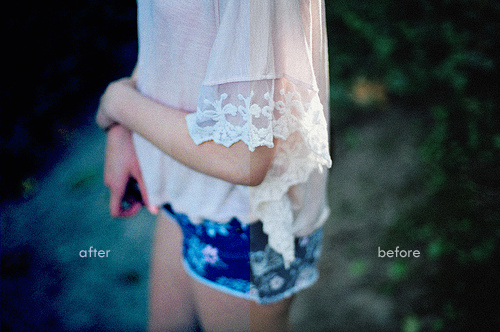
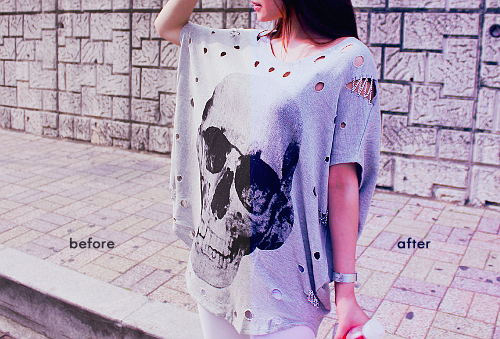
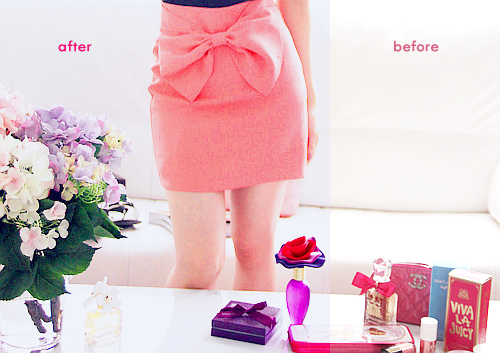
final result (before and after + examples)


download link | example | example | example | soft tones to blue; brightens reds
comment and credit if you're taking/using this | do not redistribute or claim this yours
*note: you might want to test your psd on other images before reaching final result*
final result (before and after + examples)
download link | example | example | example | soft tones to blue; brightens reds
comment and credit if you're taking/using this | do not redistribute or claim this yours
Comments